Hello World
Follow this Hello World exercise to get started with GitHub.Introduction
GitHub is a code hosting platform for version control and collaboration. It lets you and others work together on projects from anywhere. This tutorial teaches you GitHub essentials like repositories, branches, commits, and pull requests. You'll create your own Hello World repository and learn GitHub's pull request workflow, a popular way to create and review code. In this quickstart guide, you will: Create and use a repository Start and manage a new branch Make changes to a file and push them to GitHub as commits Open and merge a pull request To complete this tutorial, you need a GitHub account and Internet access. You don't need to know how to code, use the command line, or install Git (the version control software that GitHub is built on). If you have a question about any of the expressions used in this guide, head on over to the glossary to find out more about our terminology.Creating a repository
A repository is usually used to organize a single project. Repositories can contain folders and files, images, videos, spreadsheets, and data sets -- anything your project needs. Often, repositories include a README file, a file with information about your project. README files are written in the plain text Markdown language. You can use this cheat sheet to get started with Markdown syntax. GitHub lets you add a README file at the same time you create your new repository. GitHub also offers other common options such as a license file, but you do not have to select any of them now. Yourhello-world repository can be a place where you store ideas, resources, or even share and discuss things with others.
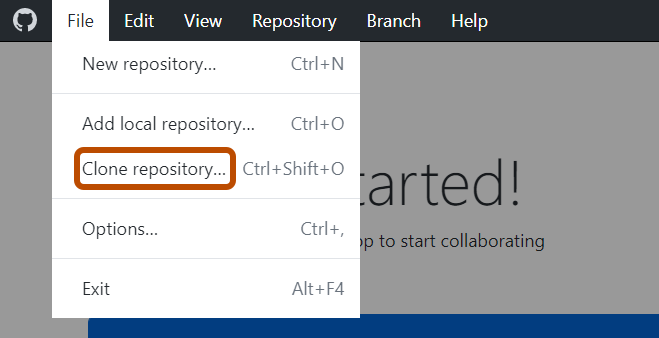
In the upper-right corner of any page, use the drop-down menu, and select 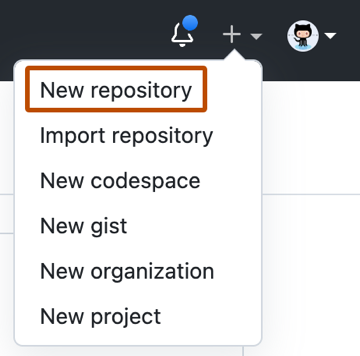 In the
 hello-world.
In the 
Creating a branch
Branching lets you have different versions of a repository at one time. By default, your repository has one branch namedmain that is considered to be the definitive branch.
You can create additional branches off of main in your repository.
You can use branches to have different versions of a project at one time.
This is helpful when you want to add new features to a project without changing the main source of code.
The work done on different branches will not show up on the main branch until you merge it, which we will cover later in this guide.
You can use branches to experiment and make edits before committing them to main.
When you create a branch off the main branch, you're making a copy, or snapshot, of main as it was at that point in time.
If someone else made changes to the main branch while you were working on your branch, you could pull in those updates.
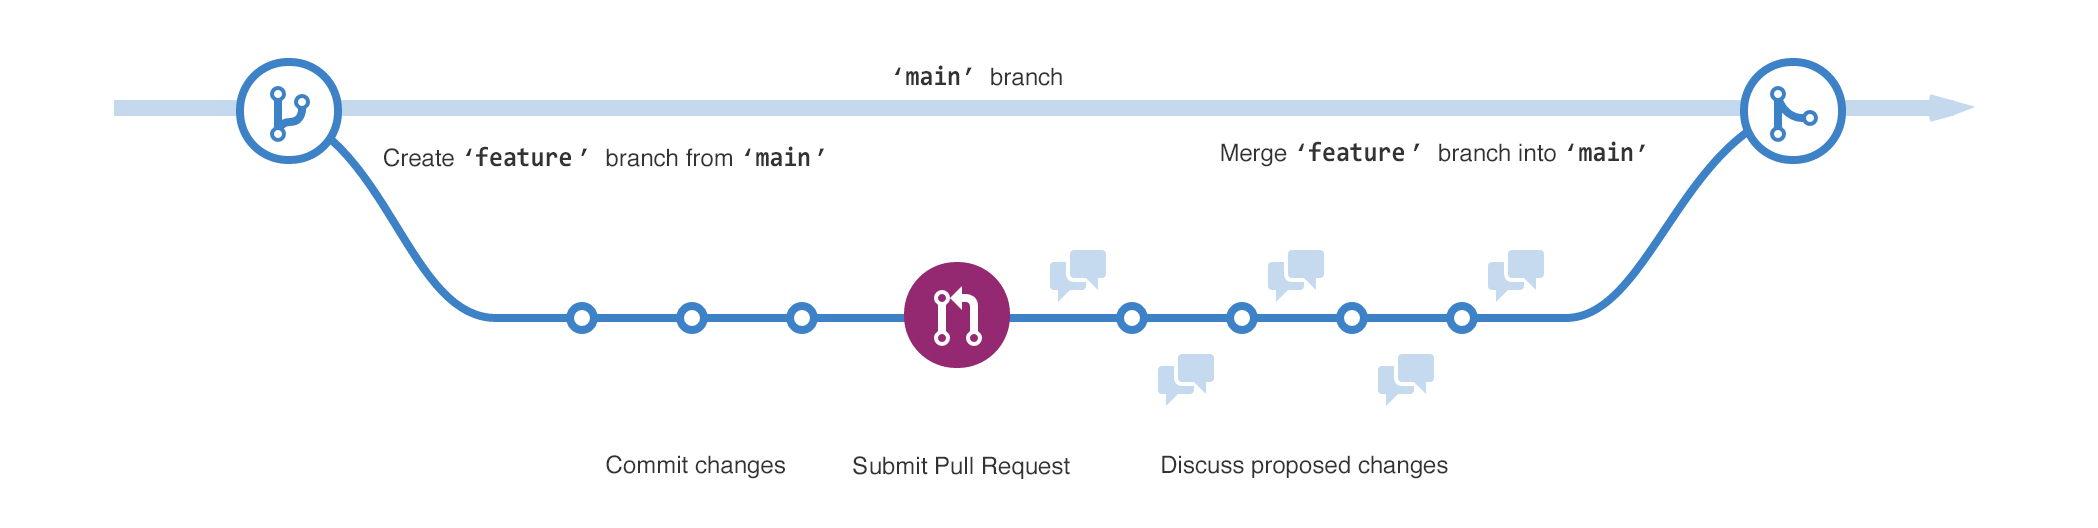
This diagram shows:
The main branch
A new branch called feature
The journey that feature takes before it's merged into main
 Have you ever saved different versions of a file? Something like:
story.txt
story-edit.txt
story-edit-reviewed.txt
Branches accomplish similar goals in GitHub repositories.
Here at GitHub, our developers, writers, and designers use branches for keeping bug fixes and feature work separate from our main (production) branch.
When a change is ready, they merge their branch into main.
Create a branch
Click thehello-world repository.
Above the file list, click the dropdown menu that says  Type a branch name,
 readme-edits, into the text box.
Click 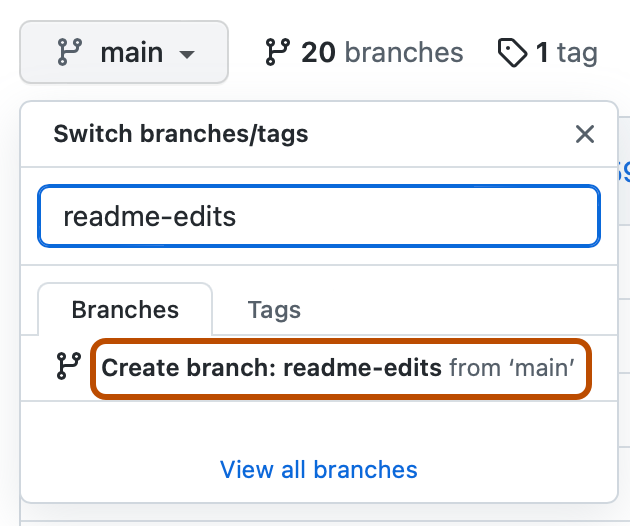 Now you have two branches,
 main and readme-edits.
Right now, they look exactly the same.
Next you'll add changes to the new branch.
Making and committing changes
When you created a new branch in the previous step, GitHub brought you to the code page for your newreadme-edits branch, which is a copy of main.
You can make and save changes to the files in your repository.
On GitHub, saved changes are called commits.
Each commit has an associated commit message, which is a description explaining why a particular change was made.
Commit messages capture the history of your changes so that other contributors can understand what you’ve done and why.
Under the readme-edits branch you created, click the README.md file.
Click to edit the file.
In the editor, write a bit about yourself.
Try using different Markdown elements.
In the  These changes will be made only to the README file on your
 readme-edits branch, so now this branch contains content that's different from main.
Opening a pull request
Now that you have changes in a branch off ofmain, you can open a pull request.
Pull requests are the heart of collaboration on GitHub.
When you open a pull request, you're proposing your changes and requesting that someone review and pull in your contribution and merge them into their branch.
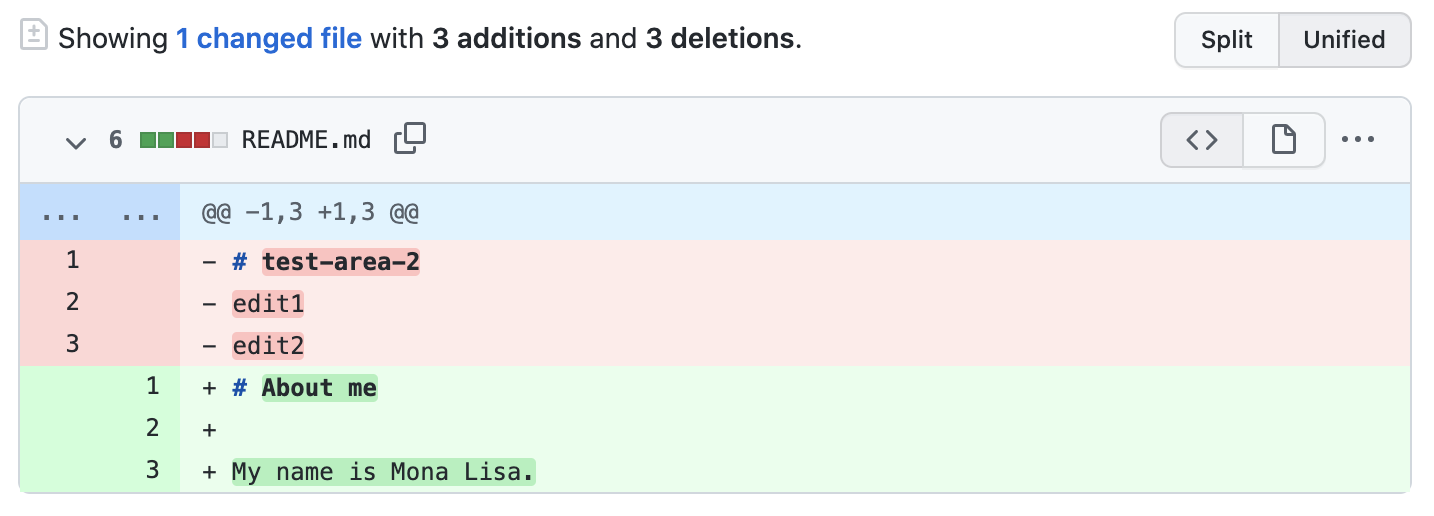
Pull requests show diffs, or differences, of the content from both branches.
The changes, additions, and subtractions are shown in different colors.
As soon as you make a commit, you can open a pull request and start a discussion, even before the code is finished.
By using GitHub's @mention feature in your pull request message, you can ask for feedback from specific people or teams, whether they're down the hall or 10 time zones away.
You can even open pull requests in your own repository and merge them yourself.
It's a great way to learn the GitHub flow before working on larger projects.
Click the hello-world repository.
Click readme-edits, to compare with main (the original).
Look over your changes in the diffs on the Compare page, make sure they're what you want to submit.
 Click
Click Merging your pull request
In this final step, you will merge yourreadme-edits branch into the main branch.
After you merge your pull request, the changes on your readme-edits branch will be incorporated into main.
Sometimes, a pull request may introduce changes to code that conflict with the existing code on main.
If there are any conflicts, GitHub will alert you about the conflicting code and prevent merging until the conflicts are resolved.
You can make a commit that resolves the conflicts or use comments in the pull request to discuss the conflicts with your team members.
In this walk-through, you should not have any conflicts, so you are ready to merge your branch into the main branch.
Click main.
 Click
Click main, you can safely delete the readme-edits branch.
If you want to make more changes to your project, you can always create a new branch and repeat this process.
Next steps
By completing this tutorial, you've learned to create a project and make a pull request on GitHub. Here's what you accomplished in this tutorial: Created an open source repository Started and managed a new branch Changed a file and committed those changes to GitHub Opened and merged a pull request Take a look at your GitHub profile and you'll see your work reflected on your contribution graph. For more information about the power of branches and pull requests, see "GitHub flow." For more information about getting started with GitHub, see the other guides in the getting started quickstart.Set up Git
At the heart of GitHub is an open-source version control system (VCS) called Git. Git is responsible for everything GitHub-related that happens locally on your computer.Using Git
To use Git on the command line, you will need to download, install, and configure Git on your computer. You can also install GitHub CLI to use GitHub from the command line. For more information, see "About GitHub CLI." If you want to work with Git locally, but do not want to use the command line, you can download and install the GitHub Desktop client. For more information, see "Installing and configuring GitHub Desktop." If you do not need to work with files locally, GitHub lets you complete many Git-related actions directly in the browser, including: Creating a repository Forking a repository Managing files Being socialSetting up Git
Download and install the latest version of Git.apt install git and then type y when prompted.
Set your username in Git.
Set your commit email address in Git.
Authenticating with GitHub from Git
When you connect to a GitHub repository from Git, you will need to authenticate with GitHub using either HTTPS or SSH.gh auth login.
Connecting over HTTPS (recommended)
If you clone with HTTPS, you can cache your GitHub credentials in Git using a credential helper. For more information, see "About remote repositories" and "Caching your GitHub credentials in Git."Connecting over SSH
If you clone with SSH, you must generate SSH keys on each computer you use to push or pull from GitHub. For more information, see "About remote repositories" and "Generating a new SSH key and adding it to the ssh-agent."Next steps
You now have Git and GitHub all set up. You may now choose to create a repository where you can put your projects. Saving your code in a repository allows you to back up your code and share it around the world. Creating a repository for your project allows you to store code in GitHub. This provides a backup of your work that you can choose to share with other developers. For more information, see “Create a repository.". Forking a repository will allow you to make changes to another repository without affecting the original. For more information, see "Fork a repo." Each repository on GitHub is owned by a person or an organization. You can interact with the people, repositories, and organizations by connecting and following them on GitHub. For more information, see "Be social." GitHub has a great support community where you can ask for help and talk to people from around the world. Join the conversation on GitHub Community.Create a repo
To put your project up on GitHub, you will need to create a repository for it to live in.Create a repository
You can store a variety of projects in GitHub repositories, including open source projects. With open source projects, you can share code to make better, more reliable software. You can use repositories to collaborate with others and track your work. For more information, see "About repositories." To learn more about open source projects, visit OpenSource.org.
Type a short, memorable name for your repository.
For example, "hello-world".
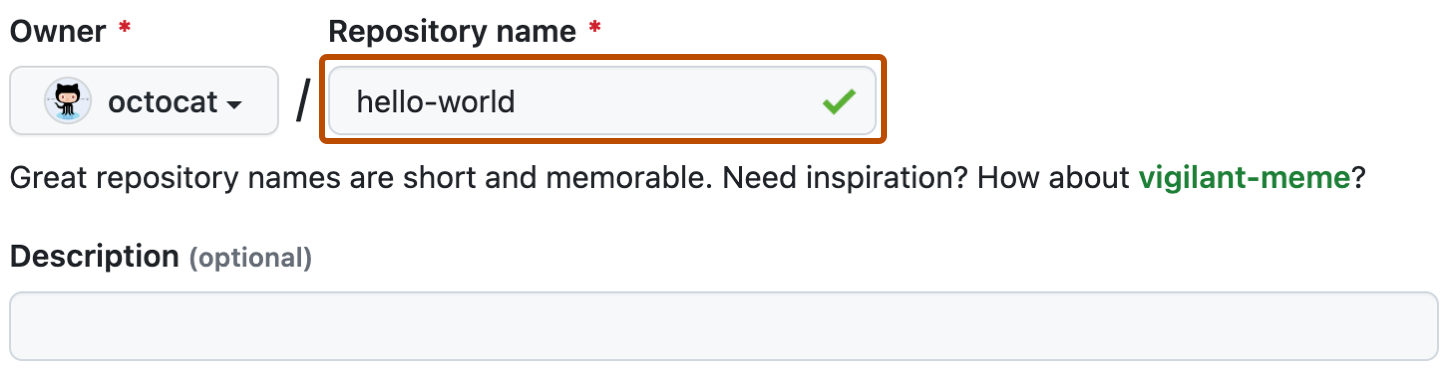 Optionally, add a description of your repository.
For example, "My first repository on GitHub."
Optionally, add a description of your repository.
For example, "My first repository on GitHub."
 Choose a repository visibility.
For more information, see "About repositories."
Choose a repository visibility.
For more information, see "About repositories."
 Select
  Click
Click  Congratulations! You've successfully created your first repository, and initialized it with a README file.
To learn more about GitHub CLI, see "About GitHub CLI."
In the command line, navigate to the directory where you would like to create a local clone of your new project.
To create a repository for your project, use the
Congratulations! You've successfully created your first repository, and initialized it with a README file.
To learn more about GitHub CLI, see "About GitHub CLI."
In the command line, navigate to the directory where you would like to create a local clone of your new project.
To create a repository for your project, use the gh repo create subcommand.
When prompted, select organization-name/project-name.
Follow the interactive prompts.
To clone the repository locally, confirm yes when asked if you would like to clone the remote project directory.
Alternatively, to skip the prompts supply the repository name and a visibility flag (--public, --private, or --internal).
For example, gh repo create project-name --public.
To clone the repository locally, pass the --clone flag.
For more information about possible arguments, see the GitHub CLI manual.
Commit your first change
A commit is like a snapshot of all the files in your project at a particular point in time. When you created your new repository, you initialized it with a README file. README files are a great place to describe your project in more detail, or add some documentation such as how to install or use your project. The contents of your README file are automatically shown on the front page of your repository. Let's commit a change to the README file. In your repository's list of files, click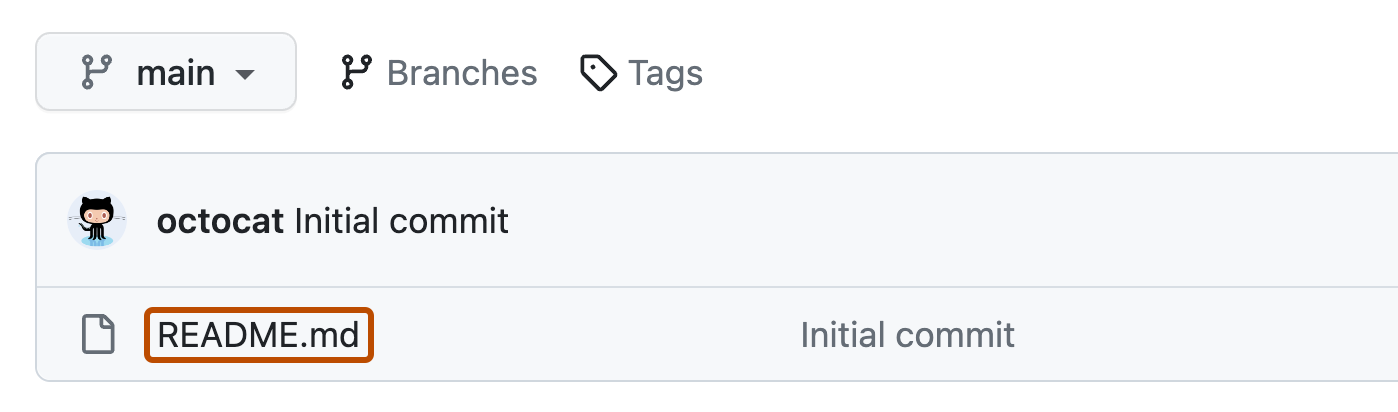 Above the file's content, click .
On the
Above the file's content, click .
On the  Above the new content, click
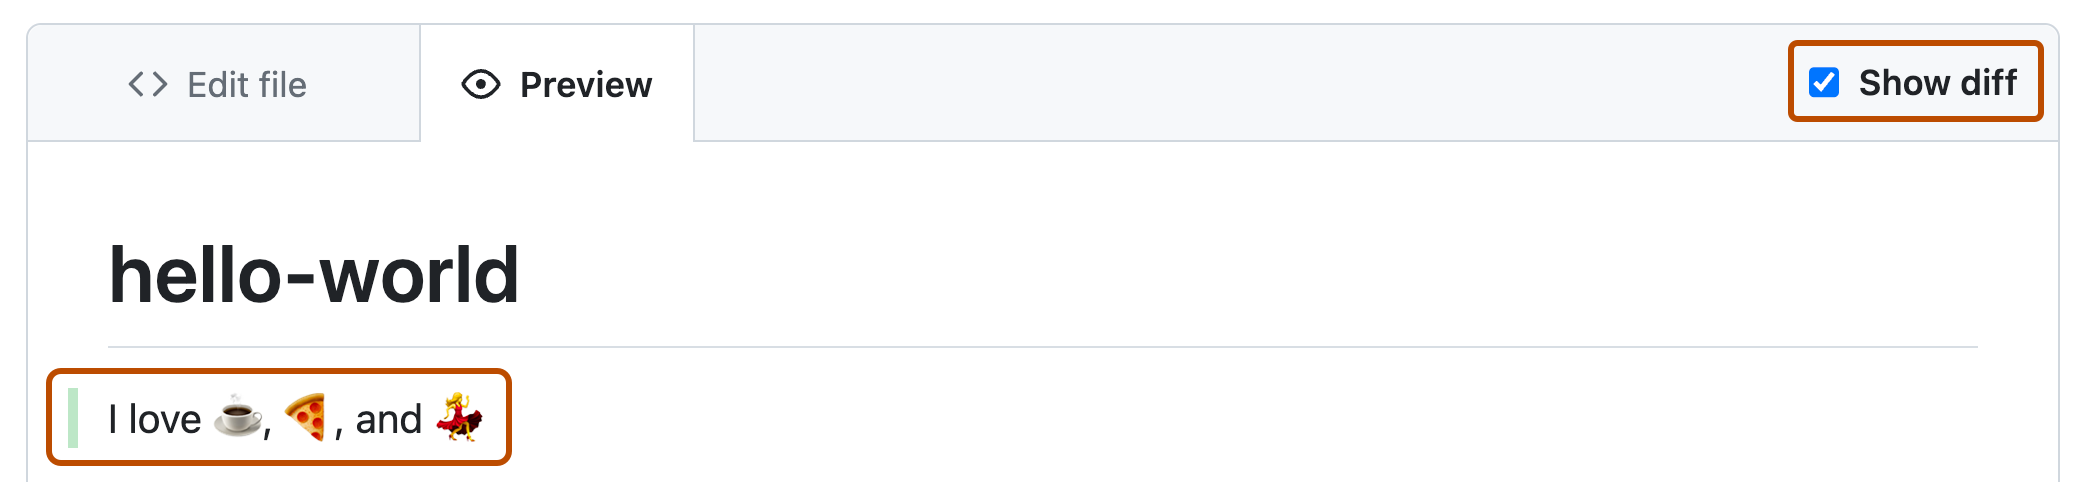
  Review the changes you made to the file.
You will see the new content in green.
Review the changes you made to the file.
You will see the new content in green.
 At the bottom of the page, type a short, meaningful commit message that describes the change you made to the file.
You can attribute the commit to more than one author in the commit message.
For more information, see "Creating a commit with multiple authors."
At the bottom of the page, type a short, meaningful commit message that describes the change you made to the file.
You can attribute the commit to more than one author in the commit message.
For more information, see "Creating a commit with multiple authors."
 Below the commit message fields, decide whether to add your commit to the current branch or to a new branch.
If your current branch is the default branch, you should choose to create a new branch for your commit and then create a pull request.
For more information, see "Creating a pull request."
Below the commit message fields, decide whether to add your commit to the current branch or to a new branch.
If your current branch is the default branch, you should choose to create a new branch for your commit and then create a pull request.
For more information, see "Creating a pull request."
 Click
Click  Now that you have created a project, you can start committing changes.
README files are a great place to describe your project in more detail, or add some documentation such as how to install or use your project.
The contents of your README file are automatically shown on the front page of your repository.
Follow these steps to add a README file.
In the command line, navigate to the root directory of your new project.
(This directory was created when you ran the
Now that you have created a project, you can start committing changes.
README files are a great place to describe your project in more detail, or add some documentation such as how to install or use your project.
The contents of your README file are automatically shown on the front page of your repository.
Follow these steps to add a README file.
In the command line, navigate to the root directory of your new project.
(This directory was created when you ran the gh repo create command.)
Create a README file with some information about the project.
echo "info about this project" >> README.md
Enter git status.
You will see that you have an untracked README.md file.
$ git status
Untracked files:
(use "git add ..." to include in what will be committed)
README.md
nothing added to commit but untracked files present (use "git add" to track)
Stage and commit the file.
git add README.md && git commit -m "Add README"
Push the changes to your branch.
git push --set-upstream origin HEAD
Next steps
You have now created a repository, including a README file, and created your first commit on GitHub.com. You can now clone a GitHub repository to create a local copy on your computer. From your local repository you can commit, and create a pull request to update the changes in the upstream repository. For more information, see "Cloning a repository" and "Set up Git." You can find interesting projects and repositories on GitHub and make changes to them by creating a fork of the repository. Forking a repository will allow you to make changes to another repository without affecting the original. For more information, see "Fork a repo." Each repository on GitHub is owned by a person or an organization. You can interact with the people, repositories, and organizations by connecting and following them on GitHub. For more information, see "Be social." GitHub has a great support community where you can ask for help and talk to people from around the world. Join the conversation on GitHub Community.Fork a repo
A fork is a new repository that shares code and visibility settings with the original “upstream” repository.About forks
A fork is a new repository that shares code and visibility settings with the original “upstream” repository. Forks are often used to iterate on ideas or changes before they are proposed back to the upstream repository, such as in open source projects or when a user does not have write access to the upstream repository. For more information, see "Working with forks."Propose changes to someone else's project
For example, you can use forks to propose changes related to fixing a bug. Rather than logging an issue for a bug you have found, you can: Fork the repository. Make the fix. Submit a pull request to the project owner.Use someone else's project as a starting point for your own idea.
Open source software is based on the idea that by sharing code, we can make better, more reliable software. For more information, see the "About the Open Source Initiative" on the Open Source Initiative. For more information about applying open source principles to your organization's development work on GitHub.com, see GitHub's white paper "An introduction to innersource." When creating your public repository from a fork of someone's project, make sure to include a license file that determines how you want your project to be shared with others. For more information, see "Choose an open source license" at choosealicense.com. For more information on open source, specifically how to create and grow an open source project, we've created Open Source Guides that will help you foster a healthy open source community by recommending best practices for creating and maintaining repositories for your open source project. You can also take a free GitHub Skills course on maintaining open source communities.Prerequisites
If you haven't yet, first set up Git and authentication with GitHub.com from Git. For more information, see "Set up Git."Forking a repository
You might fork a project to propose changes to the upstream repository. In this case, it's good practice to regularly sync your fork with the upstream repository. To do this, you'll need to use Git on the command line. You can practice setting the upstream repository using the same octocat/Spoon-Knife repository you just forked. On GitHub.com, navigate to the octocat/Spoon-Knife repository. In the top-right corner of the page, click Select an owner for the forked repository.
 By default, forks are named the same as their upstream repositories.
You can change the name of the fork to distinguish it further.
By default, forks are named the same as their upstream repositories.
You can change the name of the fork to distinguish it further.
 Optionally, add a description of your fork.
 Choose whether to copy only the default branch or all branches to the new fork.
For many forking scenarios, such as contributing to open-source projects, you only need to copy the default branch.
By default, only the default branch is copied.
Choose whether to copy only the default branch or all branches to the new fork.
For many forking scenarios, such as contributing to open-source projects, you only need to copy the default branch.
By default, only the default branch is copied.
 Click
Click 
gh repo fork subcommand.
gh repo fork REPOSITORY
To create the fork in an organization, use the --org flag.
gh repo fork REPOSITORY --org "octo-org"
You can fork a repository on GitHub.com or in GitHub Desktop.
For information about forking on GitHub.com, see the web browser version of this article.
In GitHub Desktop, if you attempt to clone a repository that you don't have write access to, a fork is automatically created for you.
In the 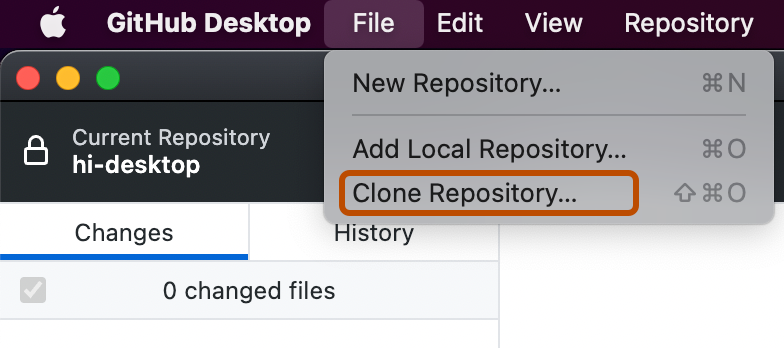
 Click the tab that corresponds to the location of the repository you want to clone.
You can also click
Click the tab that corresponds to the location of the repository you want to clone.
You can also click 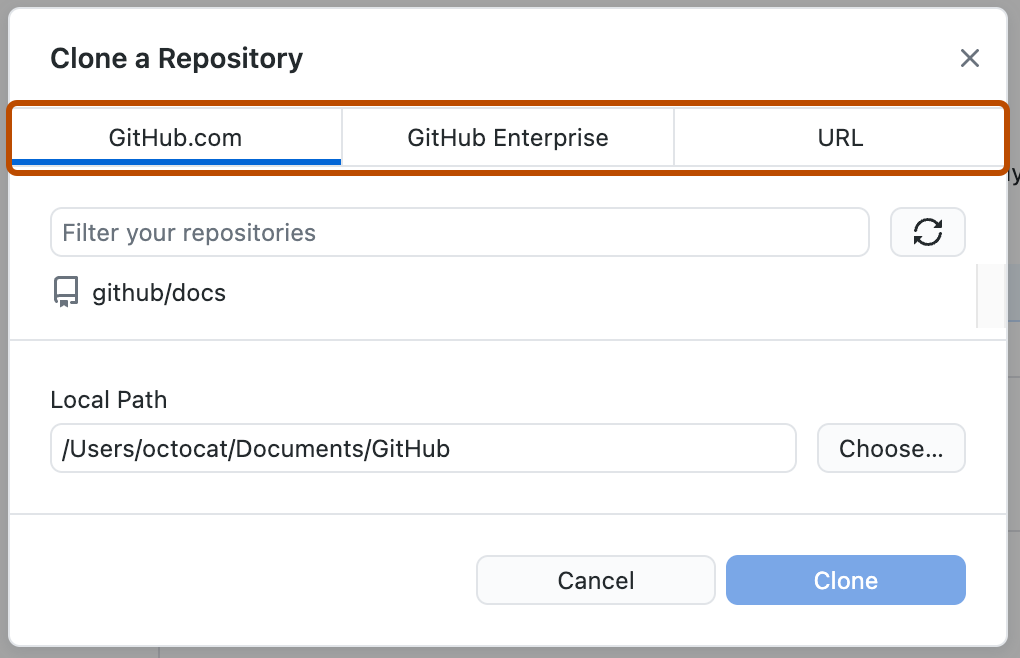
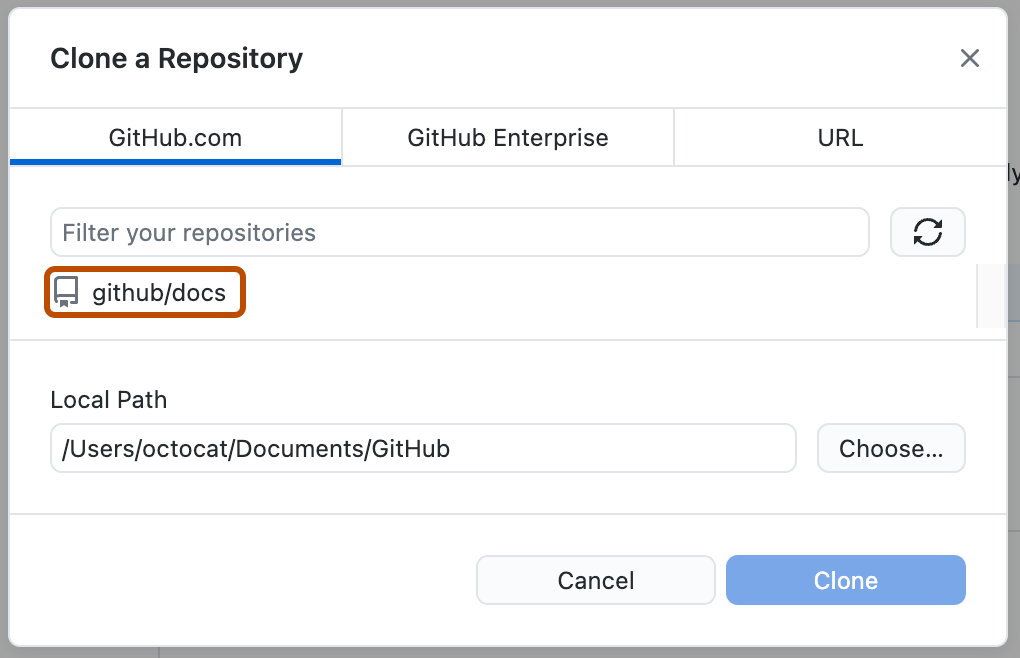
 From the list of repositories, click the repository you want to clone.
 To select the local directory into which you want to clone the repository, next to the "Local Path" field, click
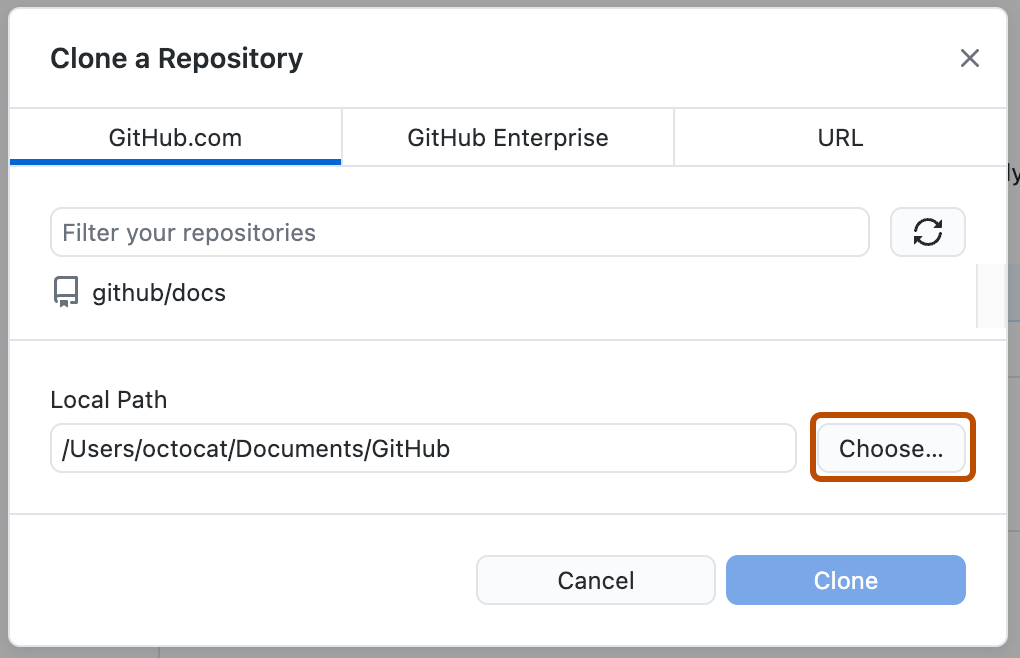
 At the bottom of the "Clone a Repository" window, click
 Cloning your forked repository
Right now, you have a fork of the Spoon-Knife repository, but you do not have the files in that repository locally on your computer. On GitHub.com, navigate to Copy the URL for the repository.
To clone the repository using HTTPS, under "HTTPS", click .
To clone the repository using an SSH key, including a certificate issued by your organization's SSH certificate authority, click
Copy the URL for the repository.
To clone the repository using HTTPS, under "HTTPS", click .
To clone the repository using an SSH key, including a certificate issued by your organization's SSH certificate authority, click 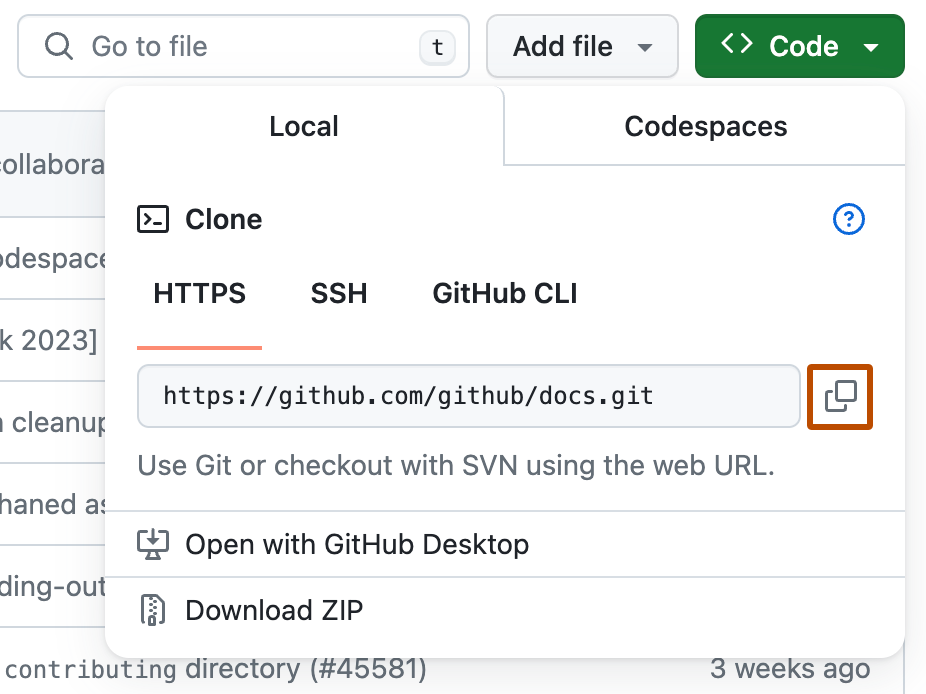 Open TerminalTerminalGit Bash.
Change the current working directory to the location where you want the cloned directory.
Type
Open TerminalTerminalGit Bash.
Change the current working directory to the location where you want the cloned directory.
Type git clone, and then paste the URL you copied earlier.
It will look like this, with your GitHub username instead of YOUR-USERNAME:
$ git clone https://github.com/YOUR-USERNAME/Spoon-Knife
Press $ git clone https://github.com/YOUR-USERNAME/Spoon-Knife
> Cloning into `Spoon-Knife`...
> remote: Counting objects: 10, done.
> remote: Compressing objects: 100% (8/8), done.
> remote: Total 10 (delta 1), reused 10 (delta 1)
> Unpacking objects: 100% (10/10), done.
To learn more about GitHub CLI, see "About GitHub CLI."
To create a clone of your fork, use the --clone flag.
gh repo fork REPOSITORY --clone=true
In the
Click the tab that corresponds to the location of the repository you want to clone.
You can also click
From the list of repositories, click the repository you want to clone.
To select the local directory into which you want to clone the repository, next to the "Local Path" field, click
At the bottom of the "Clone a Repository" window, click Configuring Git to sync your fork with the upstream repository
When you fork a project in order to propose changes to the upstream repository, you can configure Git to pull changes from the upstream repository into the local clone of your fork. On GitHub.com, navigate to the octocat/Spoon-Knife repository. Above the list of files, click
Copy the URL for the repository.
To clone the repository using HTTPS, under "HTTPS", click .
To clone the repository using an SSH key, including a certificate issued by your organization's SSH certificate authority, click
Open TerminalTerminalGit Bash.
Change directories to the location of the fork you cloned.
To go to your home directory, type just cd with no other text.
To list the files and folders in your current directory, type ls.
To go into one of your listed directories, type cd your_listed_directory.
To go up one directory, type cd ...
Type git remote -v and press $ git remote -v
> origin https://github.com/YOUR_USERNAME/YOUR_FORK.git (fetch)
> origin https://github.com/YOUR_USERNAME/YOUR_FORK.git (push)
Type git remote add upstream, and then paste the URL you copied in Step 3 and press $ git remote add upstream https://github.com/ORIGINAL_OWNER/Spoon-Knife.git
To verify the new upstream repository you have specified for your fork, type git remote -v again.
You should see the URL for your fork as origin, and the URL for the upstream repository as upstream.
$ git remote -v
> origin https://github.com/YOUR_USERNAME/YOUR_FORK.git (fetch)
> origin https://github.com/YOUR_USERNAME/YOUR_FORK.git (push)
> upstream https://github.com/ORIGINAL_OWNER/ORIGINAL_REPOSITORY.git (fetch)
> upstream https://github.com/ORIGINAL_OWNER/ORIGINAL_REPOSITORY.git (push)
Now, you can keep your fork synced with the upstream repository with a few Git commands.
For more information, see "Syncing a fork."
To learn more about GitHub CLI, see "About GitHub CLI."
To configure a remote repository for the forked repository, use the --remote flag.
gh repo fork REPOSITORY --remote=true
To specify the remote repository's name, use the --remote-name flag.
gh repo fork REPOSITORY --remote-name "main-remote-repo"
Editing a fork
You can make any changes to a fork, including:Find another repository to fork
Fork a repository to start contributing to a project. You can fork any public repository to your personal account, or to an organization where you have permission to create repositories. If you have access to a private repository and the owner permits forking, you can fork the repository to your personal account, or to an organization on GitHub Team where you have permission to create repositories. You cannot fork a private repository to an organization using GitHub Free. For more information about GitHub Team and GitHub Free, see "GitHub’s products." For more information about when you can fork a repository, see "About permissions and visibility of forks." You can browse Explore to find projects and start contributing to open source repositories. For more information, see "Finding ways to contribute to open source on GitHub."Next Steps
You have now forked a repository, practiced cloning your fork, and configured an upstream repository. For more information about cloning the fork and syncing the changes in a forked repository from your computer, see "Set up Git." You can also create a new repository where you can put all your projects and share the code on GitHub. Creating a repository for your project allows you to store code in GitHub. This provides a backup of your work that you can choose to share with other developers. For more information, see “Create a repository."" Each repository on GitHub is owned by a person or an organization. You can interact with the people, repositories, and organizations by connecting and following them on GitHub. For more information, see "Be social." GitHub has a great support community where you can ask for help and talk to people from around the world. Join the conversation on GitHub Community.GitHub flow
Follow GitHub flow to collaborate on projects.Introduction
GitHub flow is a lightweight, branch-based workflow. The GitHub flow is useful for everyone, not just developers. For example, here at GitHub, we use GitHub flow for our site policy, documentation, and roadmap.Prerequisites
To follow GitHub flow, you will need a GitHub account and a repository. For information on how to create an account, see "Signing up for GitHub." For information on how to create a repository, see "Create a repo." For information on how to find an existing repository to contribute to, see "Finding ways to contribute to open source on GitHub."Following GitHub flow
Create a branch
Create a branch in your repository. A short, descriptive branch name enables your collaborators to see ongoing work at a glance. For example,increase-test-timeout or add-code-of-conduct.
For more information, see "Creating and deleting branches within your repository."
By creating a branch, you create a space to work without affecting the default branch.
Additionally, you give collaborators a chance to review your work.
Make changes
On your branch, make any desired changes to the repository. For more information, see "Creating new files", "Editing files", "Renaming a file", "Moving a file to a new location", or "Deleting files in a repository". Your branch is a safe place to make changes. If you make a mistake, you can revert your changes or push additional changes to fix the mistake. Your changes will not end up on the default branch until you merge your branch. Commit and push your changes to your branch. Give each commit a descriptive message to help you and future contributors understand what changes the commit contains. For example,fix typo or increase rate limit.
Ideally, each commit contains an isolated, complete change.
This makes it easy to revert your changes if you decide to take a different approach.
For example, if you want to rename a variable and add some tests, put the variable rename in one commit and the tests in another commit.
Later, if you want to keep the tests but revert the variable rename, you can revert the specific commit that contained the variable rename.
If you put the variable rename and tests in the same commit or spread the variable rename across multiple commits, you would spend more effort reverting your changes.
By committing and pushing your changes, you back up your work to remote storage.
This means that you can access your work from any device.
It also means that your collaborators can see your work, answer questions, and make suggestions or contributions.
Continue to make, commit, and push changes to your branch until you are ready to ask for feedback.
Create a pull request
Create a pull request to ask collaborators for feedback on your changes. Pull request review is so valuable that some repositories require an approving review before pull requests can be merged. If you want early feedback or advice before you complete your changes, you can mark your pull request as a draft. For more information, see "Creating a pull request." When you create a pull request, include a summary of the changes and what problem they solve. You can include images, links, and tables to help convey this information. If your pull request addresses an issue, link the issue so that issue stakeholders are aware of the pull request and vice versa. If you link with a keyword, the issue will close automatically when the pull request merges. For more information, see "Basic writing and formatting syntax" and "Linking a pull request to an issue." In addition to filling out the body of the pull request, you can add comments to specific lines of the pull request to explicitly point something out to the reviewers.
 Your repository may be configured to automatically request a review from specific teams or users when a pull request is created.
You can also manually @mention or request a review from specific people or teams.
If your repository has checks configured to run on pull requests, you will see any checks that failed on your pull request.
This helps you catch errors before merging your branch.
For more information, see "About status checks."
Your repository may be configured to automatically request a review from specific teams or users when a pull request is created.
You can also manually @mention or request a review from specific people or teams.
If your repository has checks configured to run on pull requests, you will see any checks that failed on your pull request.
This helps you catch errors before merging your branch.
For more information, see "About status checks."
Address review comments
Reviewers should leave questions, comments, and suggestions. Reviewers can comment on the whole pull request or add comments to specific lines. You and reviewers can insert images or code suggestions to clarify comments. For more information, see "Reviewing changes in pull requests." You can continue to commit and push changes in response to the reviews. Your pull request will update automatically.Merge your pull request
Once your pull request is approved, merge your pull request. This will automatically merge your branch so that your changes appear on the default branch. GitHub retains the history of comments and commits in the pull request to help future contributors understand your changes. For more information, see "Merging a pull request." GitHub will tell you if your pull request has conflicts that must be resolved before merging. For more information, see "Addressing merge conflicts." Branch protection settings may block merging if your pull request does not meet certain requirements. For example, you need a certain number of approving reviews or an approving review from a specific team. For more information, see "About protected branches."Delete your branch
After you merge your pull request, delete your branch. This indicates that the work on the branch is complete and prevents you or others from accidentally using old branches. For more information, see "Deleting and restoring branches in a pull request." Don't worry about losing information. Your pull request and commit history will not be deleted. You can always restore your deleted branch or revert your pull request if needed.Contributing to projects
Learn how to contribute to a project through forking.About forking
If you want to contribute to someone else's project but don't have write access to the repository, you can use a "fork and pull request" workflow. A fork is a new repository that shares code and visibility settings with the original “upstream” repository. Forks are often used to iterate on ideas or changes before they are proposed back to the upstream repository, such as in open source projects or when a user does not have write access to the upstream repository. You can contribute by submitting pull requests from your fork to the upstream repository. For more information, see "Fork a repo."Forking a repository
This tutorial uses the Spoon-Knife project, a test repository that's hosted on GitHub.com that lets you test the fork and pull request workflow. Navigate to theSpoon-Knife project at https://github.com/octocat/Spoon-Knife.
Click
Select an owner for the forked repository.
By default, forks are named the same as their upstream repositories.
You can change the name of the fork to distinguish it further.
Optionally, add a description of your fork.
Choose whether to copy only the default branch or all branches to the new fork.
For many forking scenarios, such as contributing to open-source projects, you only need to copy the default branch.
By default, only the default branch is copied.
Click
Cloning a fork
You've successfully forked the Spoon-Knife repository, but so far, it only exists on GitHub. To be able to work on the project, you will need to clone it to your computer. You can clone your fork with the command line, GitHub CLI, or GitHub Desktop. On GitHub, navigate to
Copy the URL for the repository.
To clone the repository using HTTPS, under "HTTPS", click .
To clone the repository using an SSH key, including a certificate issued by your organization's SSH certificate authority, click
Open TerminalTerminalGit Bash.
Change the current working directory to the location where you want the cloned directory.
Type git clone, and then paste the URL you copied earlier.
It will look like this, with your GitHub username instead of YOUR-USERNAME:
$ git clone https://github.com/YOUR-USERNAME/Spoon-Knife
Press $ git clone https://github.com/YOUR-USERNAME/Spoon-Knife
> Cloning into `Spoon-Knife`...
> remote: Counting objects: 10, done.
> remote: Compressing objects: 100% (8/8), done.
> remove: Total 10 (delta 1), reused 10 (delta 1)
> Unpacking objects: 100% (10/10), done.
To learn more about GitHub CLI, see "About GitHub CLI."
To create a clone of your fork, use the --clone flag.
gh repo fork REPOSITORY --clone=true
In the
Click the tab that corresponds to the location of the repository you want to clone.
You can also click
From the list of repositories, click the repository you want to clone.
To select the local directory into which you want to clone the repository, next to the "Local Path" field, click
At the bottom of the "Clone a Repository" window, click Creating a branch to work on
Before making changes to the project, you should create a new branch and check it out. By keeping changes in their own branch, you follow GitHub Flow and ensure that it will be easier to contribute to the same project again in the future. For more information, see "GitHub flow."git branch BRANCH-NAME
git checkout BRANCH-NAME
git branch BRANCH-NAME
git checkout BRANCH-NAME
For more information about how to create and manage branches in GitHub Desktop, see "Managing branches."
Making and pushing changes
Go ahead and make a few changes to the project using your favorite text editor, like Visual Studio Code. You could, for example, change the text inindex.html to add your GitHub username.
When you're ready to submit your changes, stage and commit your changes.
git add . tells Git that you want to include all of your changes in the next commit.
git commit takes a snapshot of those changes.
git add .
git commit -m "a short description of the change"
git add .
git commit -m "a short description of the change"
For more information about how to stage and commit changes in GitHub Desktop, see "Committing and reviewing changes to your project."
When you stage and commit files, you essentially tell Git, "Okay, take a snapshot of my changes!" You can continue to make more changes, and take more commit snapshots.
Right now, your changes only exist locally.
When you're ready to push your changes up to GitHub, push your changes to the remote.
git push
git push
For more information about how to push changes in GitHub Desktop, see "Pushing changes to GitHub."
Making a pull request
At last, you're ready to propose changes into the main project! This is the final step in producing a fork of someone else's project, and arguably the most important. If you've made a change that you feel would benefit the community as a whole, you should definitely consider contributing back. To do so, head on over to the repository on GitHub where your project lives. For this example, it would be athttps://github.com/<your_username>/Spoon-Knife.
You'll see a banner indicating that your branch is one commit ahead of octocat:main.
Click octocat/Spoon-Knife repository.
Click Managing feedback
Pull Requests are an area for discussion. In this case, the Octocat is very busy, and probably won't merge your changes. For other projects, don't be offended if the project owner rejects your pull request, or asks for more information on why it's been made. It may even be that the project owner chooses not to merge your pull request, and that's totally okay. Your changes exist in your fork. And who knows--maybe someone you've never met will find your changes much more valuable than the original project.Finding projects
You've successfully forked and contributed back to a repository. Go forth, and contribute some more! For more information, see "Finding ways to contribute to open source on GitHub."Be social
You can interact with people, repositories, and organizations on GitHub. See what others are working on and who they are connecting with from your personal dashboard. To learn about accessing your personal dashboard, see "About your personal dashboard."Following people
When you follow someone on GitHub, you will get notifications on your personal dashboard about their public activity. If someone you follow creates a new repository, stars a repository, or follows another user, the activity will display in your dashboard. To follow someone, clickWatching a repository
You can subscribe to a repository to watch it and receive notifications for activity in it. When the owner updates the repository, you will see the changes in your personal dashboard. For more information, see "Viewing your subscriptions." Click
Joining the conversation
You can connect with developers around the world to ask and answer questions, learn, and interact directly with GitHub staff. To get the conversation started, see "GitHub Community Support."Communicating on GitHub
GitHub provides built-in collaborative communication tools, allowing you to interact closely with your community when building great software. For example, you can contribute to another user's project by creating a pull request, or use issues to track bugs or suggest ideas in a repository. You can also brainstorm new ideas with your team with discussions. For an overview of these tools, see "Communicating on GitHub."Participating in organizations
Organizations are shared accounts where businesses and open-source projects can collaborate across many projects at once. Owners and administrators can establish teams with special permissions, have a public organization profile, and keep track of activity within the organization. For more information, see "About organizations." From your dashboard, click the drop down menu of your username on the left side of your dashboard. Here, you can view organizations that you are a part of and easily switch between them.Following organizations
 For more information, see "Following organizations."
Exploring other projects on GitHub
You can discover new and interesting projects on GitHub's Explore page. You can star interesting projects to make them easy to find again later. Visit your stars page to see all your starred projects. For more information about stars, see "Saving repositories with stars." Your dashboard feed displays projects based on your interests including repositories you star, people you follow, and your contributions to public repositories. From your dashboard, you can see trending projects, view topics, and check out collections. To explore more projects, see "Explore GitHub".Next steps
You are now connected to the GitHub community. There are other ways to interact and build within GitHub. Synchronizing GitHub repositories with your computer allows you to work locally and push your changes to GitHub. For more information, see “Set up Git.” Creating a repository for your project allows you to store code in GitHub. This provides a backup of your work that you can choose to share with other developers. For more information, see “Create a repository." Forking a repository will allow you to make changes to another repository without affecting the original. For more information, see "Fork a repo." GitHub connects users and allows you to interact with other projects. To learn more about contributing to someone else's project, see "Contributing to projects." GitHub has a great support community where you can ask for help and talk to people from around the world. Join the conversation on GitHub Community.Communicating on GitHub
You can discuss specific projects and changes, as well as broader ideas or team goals, using different types of discussions on GitHub.Introduction
GitHub provides built-in collaborative communication tools allowing you to interact closely with your community. This quickstart guide will show you how to pick the right tool for your needs. You can create and participate in issues, pull requests, GitHub Discussions, and team discussions, depending on the type of conversation you'd like to have.GitHub Issues
are useful for discussing specific details of a project such as bug reports, planned improvements and feedback. are specific to a repository, and usually have a clear owner. are often referred to as GitHub's bug-tracking system.Pull requests
allow you to propose specific changes. allow you to comment directly on proposed changes suggested by others. are specific to a repository.GitHub Discussions
are like a forum, and are best used for open-form ideas and discussions where collaboration is important. may span many repositories. provide a collaborative experience outside the codebase, allowing the brainstorming of ideas, and the creation of a community knowledge base. often don’t have a clear owner. often do not result in an actionable task.Team discussions
can be started on your team's page for conversations that span across projects and don't belong in a specific issue or pull request. Instead of opening an issue in a repository to discuss an idea, you can include the entire team by having a conversation in a team discussion. allow you to hold discussions with your team about planning, analysis, design, user research and general project decision making in one place.Which discussion tool should I use?
Scenarios for issues
I want to keep track of tasks, enhancements and bugs. I want to file a bug report. I want to share feedback about a specific feature. I want to ask a question about files in the repository.Issue example
This example illustrates how a GitHub user created an issue in our documentation open source repository to make us aware of a bug, and discuss a fix.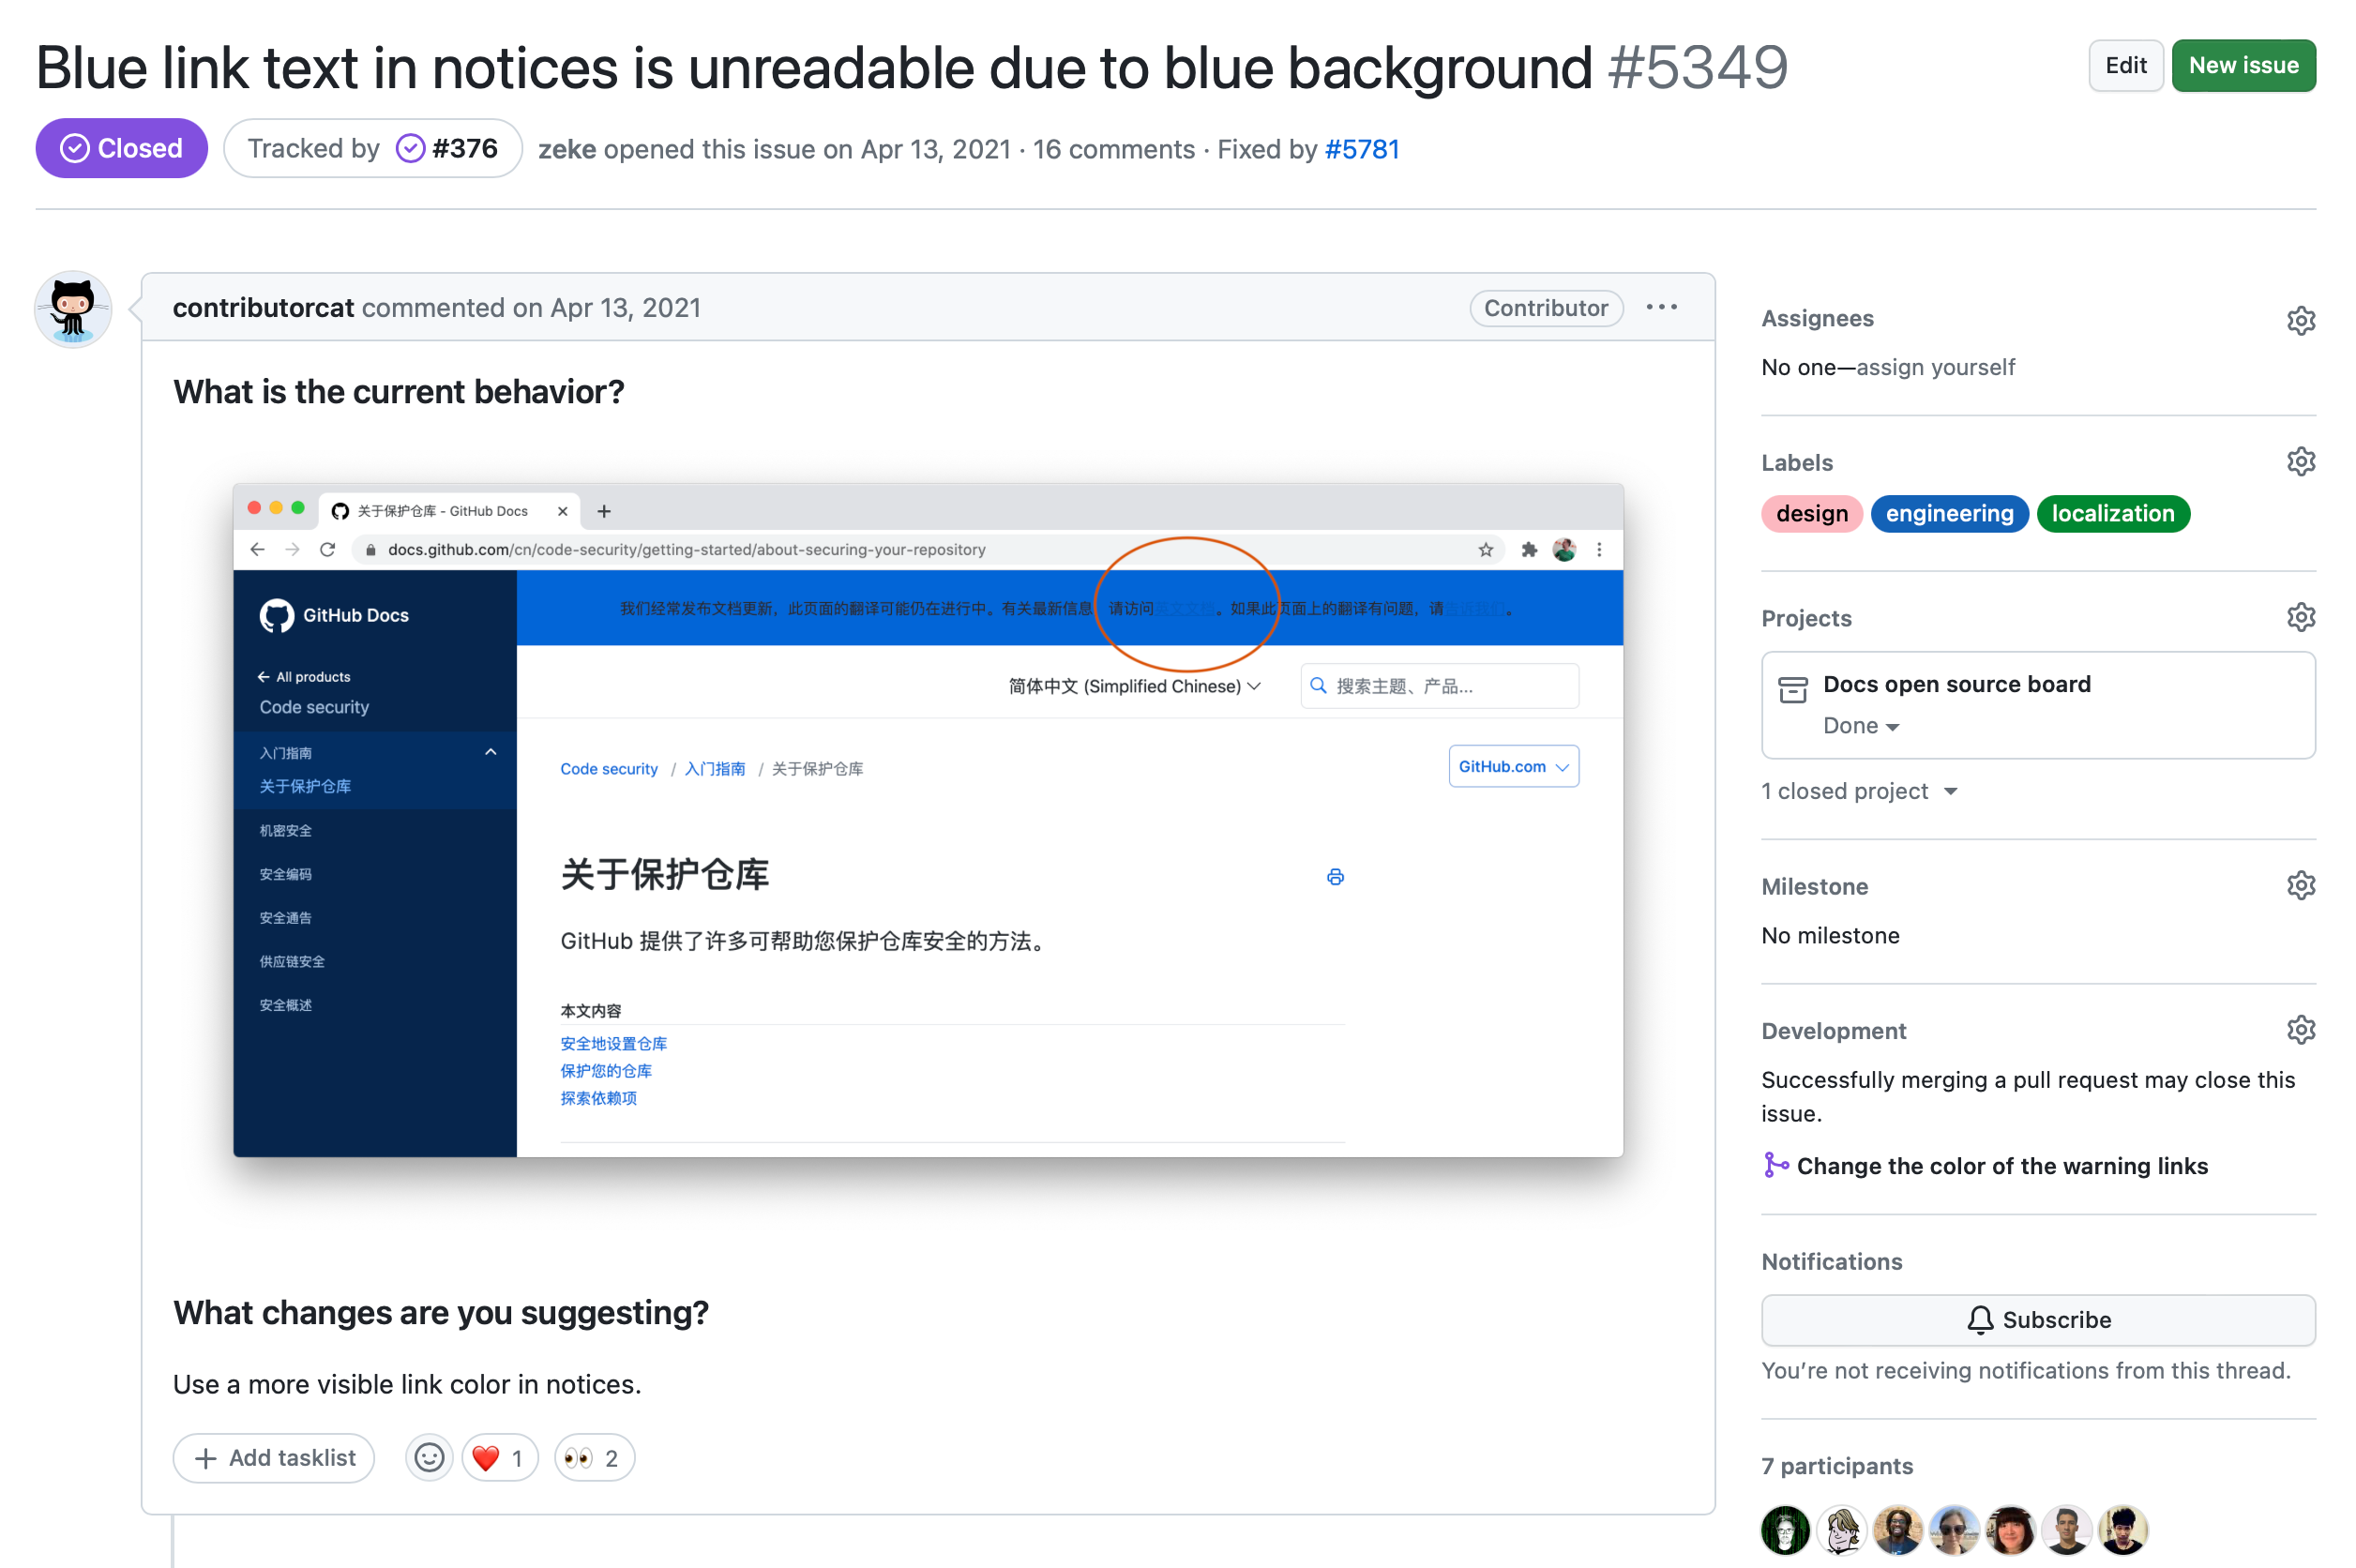 A user noticed that the blue color of the banner at the top of the page in the Chinese version of the GitHub Docs makes the text in the banner unreadable.
The user created an issue in the repository, stating the problem and suggesting a fix (which is, use a different background color for the banner).
A discussion ensues, and eventually, a consensus will be reached about the fix to apply.
A contributor can then create a pull request with the fix.
A user noticed that the blue color of the banner at the top of the page in the Chinese version of the GitHub Docs makes the text in the banner unreadable.
The user created an issue in the repository, stating the problem and suggesting a fix (which is, use a different background color for the banner).
A discussion ensues, and eventually, a consensus will be reached about the fix to apply.
A contributor can then create a pull request with the fix.
Scenarios for pull requests
I want to fix a typo in a repository. I want to make changes to a repository. I want to make changes to fix an issue. I want to comment on changes suggested by others.Pull request example
This example illustrates how a GitHub user created a pull request in our documentation open source repository to fix a typo. In the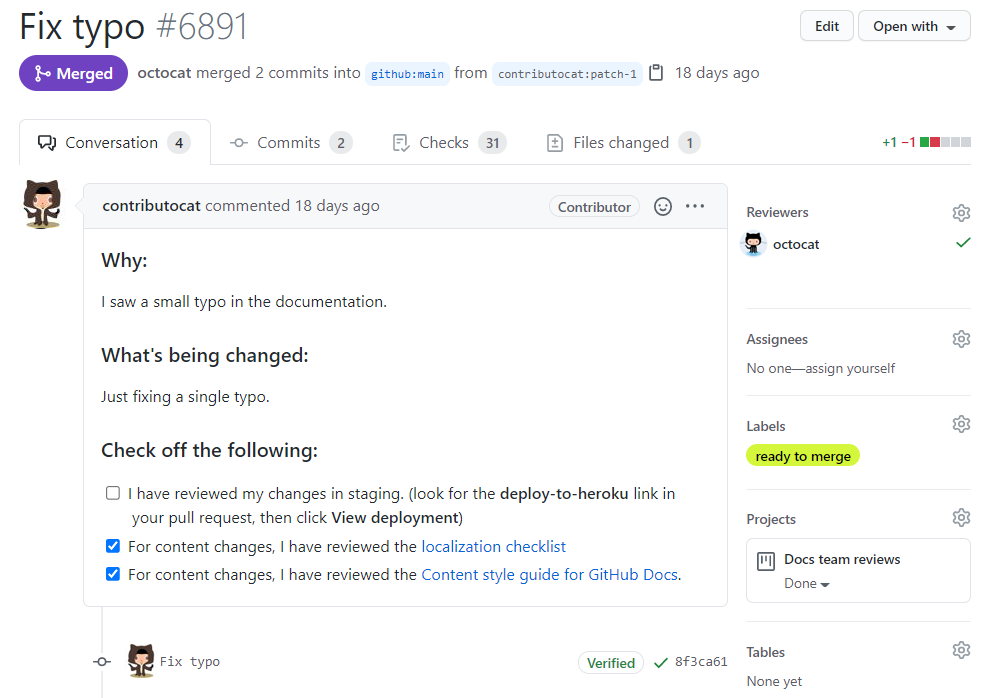 The
The 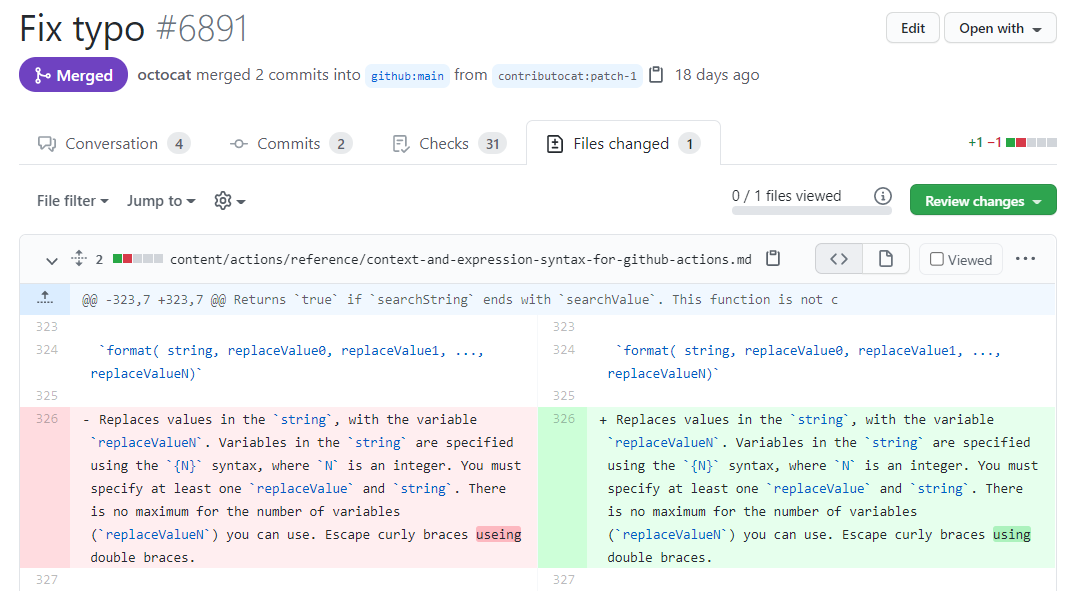 This contributor notices a typo in the repository.
The user creates a pull request with the fix.
A repository maintainer reviews the pull request, comments on it, and merges it.
This contributor notices a typo in the repository.
The user creates a pull request with the fix.
A repository maintainer reviews the pull request, comments on it, and merges it.
Scenarios for GitHub Discussions
I have a question that's not necessarily related to specific files in the repository. I want to share news with my collaborators, or my team. I want to start or participate in an open-ended conversation. I want to make an announcement to my community.GitHub Discussions example
This example shows the GitHub Discussions welcome post for the GitHub Docs open source repository, and illustrates how the team wants to collaborate with their community.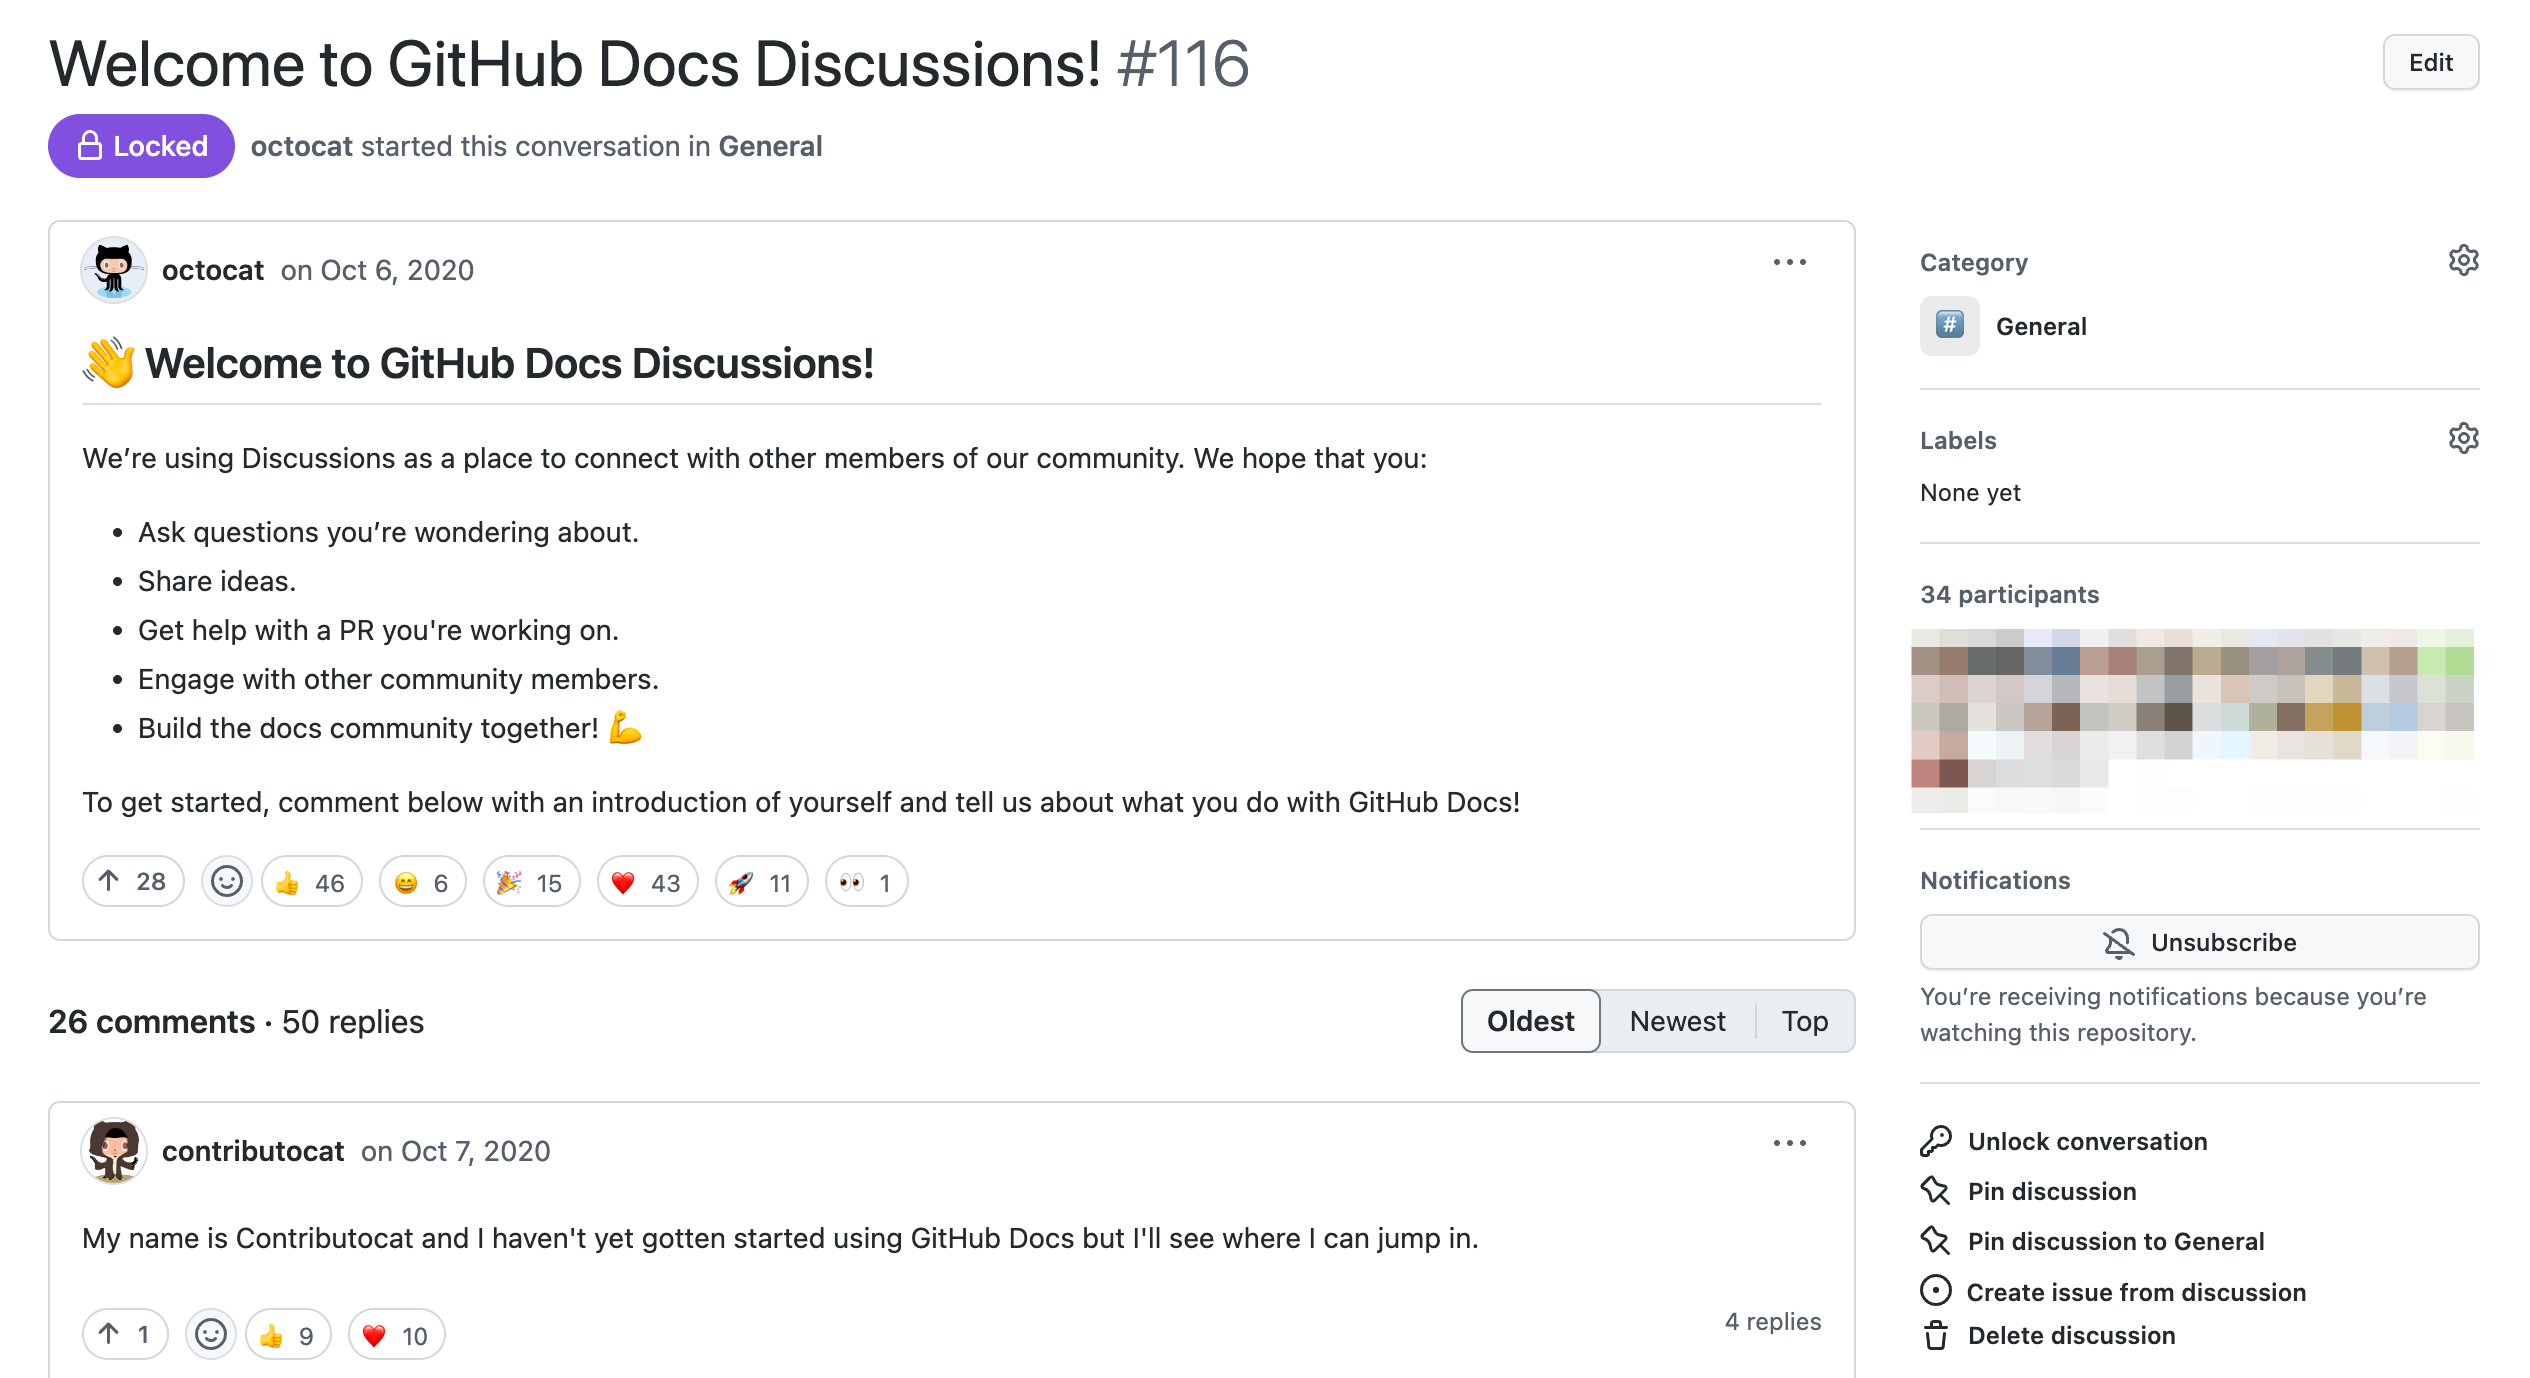 This community maintainer started a discussion to welcome the community, and to ask members to introduce themselves.
This post fosters an inviting atmosphere for visitors and contributors.
The post also clarifies that the team's happy to help with contributions to the repository.
This community maintainer started a discussion to welcome the community, and to ask members to introduce themselves.
This post fosters an inviting atmosphere for visitors and contributors.
The post also clarifies that the team's happy to help with contributions to the repository.
Scenarios for team discussions
I have a question that's not necessarily related to specific files in the repository. I want to share news with my collaborators, or my team. I want to start or participate in an open-ended conversation. I want to make an announcement to my team. As you can see, team discussions are very similar to GitHub Discussions. For GitHub.com, we recommend using GitHub Discussions as the starting point for conversations. You can use GitHub Discussions to collaborate with any community on GitHub. If you are part of an organization, and would like to initiate conversations within your organization or team within that organization, you should use team discussions.Team discussion example
This example shows a team post for theocto-team team.
 The
The octocat team member posted a team discussion, informing the team of various things:
A team member called Mona started remote game events.
There is a blog post describing how the teams use GitHub Actions to produce their docs.
Material about the April All Hands is now available for all team members to view.
Next steps
These examples showed you how to decide which is the best tool for your conversations on GitHub. But this is only the beginning; there is so much more you can do to tailor these tools to your needs. For issues, for example, you can tag issues with labels for quicker searching and create issue templates to help contributors open meaningful issues. For more information, see "About issues" and "About issue and pull request templates." For pull requests, you can create draft pull requests if your proposed changes are still a work in progress. Draft pull requests cannot be merged until they're marked as ready for review. For more information, see "About pull requests." For GitHub Discussions, you can set up a code of conduct and pin discussions that contain important information for your community. For more information, see "About discussions." For team discussions, you can edit or delete discussions on a team's page, and you can configure notifications for team discussions. For more information, see "About team discussions." To learn some advanced formatting features that will help you communicate, see "Quickstart for writing on GitHub."GitHub glossary
This glossary introduces common Git and GitHub terminology.@mention
To notify a person on GitHub by using@ before their username.
Users in an organization on GitHub can also be a part of a team that can be mentioned.
access token
A token that is used in place of a password when performing Git operations over HTTPS with Git on the command line or the API. Also called a personal access token.API preview
A way to try out new APIs and changes to existing API methods before they become part of the official GitHub API.appliance
A software application combined with just enough operating system (JeOS) to run optimally on industry-standard hardware (typically a server) or in a virtual machine.assignee
The user that is assigned to an issue.authentication code
A code you'll supply, in addition to your GitHub password, when signing in with 2FA via the browser. This code is either generated by an application or delivered to your phone via text message. Also called a "2FA authentication code."base branch
The branch into which changes are combined when you merge a pull request. When you create a pull request, you can change the base branch from the repository's default branch to another branch if required.basic authentication
A method of authentication where the credentials are sent as unencrypted text.billing cycle
The interval of time for your specific billing plan.billing email
The organization email address where GitHub sends receipts, credit card or PayPal charges, and other billing-related communication.billing manager
The organization member that manages billing settings for an organization.billing plan
Payment plans for users and organizations that include set features for each type of plan.bio
The user-generated description found on a profile: Adding a bio to your profileblame
The "blame" feature in Git describes the last modification to each line of a file, which generally displays the revision, author and time. This is helpful, for example, in tracking down when a feature was added, or which commit led to a particular bug.block
To remove a user's ability to collaborate on an organization's repositories.branch
A branch is a parallel version of a repository. It is contained within the repository, but does not affect the primary or main branch allowing you to work freely without disrupting the "live" version. When you've made the changes you want to make, you can merge your branch back into the main branch to publish your changes.branch restriction
A restriction that repository admins can enable so that only certain users or teams can push or make certain changes to the branch.Business plan
An organization billing plan where you can collaborate on unlimited public and private repositories, allow or require organization members to authenticate to GitHub using SAML SSO, and provision and deprovision access with SAML or SCIM.CA certificate
A digital certificate issued by Certificate Authority (CA) that ensures there are valid connections between two machines, such as a user's computer and GitHub.com and verifies the ownership of a site.card
A movable square within a project board associated with an issue or pull request.check
A check is a type of status check on {% data variables.product.product_name %}. See "Status checks."checkout
You can usegit checkout on the command line to create a new branch, change your current working branch to a different branch, or even to switch to a different version of a file from a different branch with git checkout [branchname] [path to file].
The "checkout" action updates all or part of the working tree with a tree object or blob from the object database, and updates the index and HEAD if the whole working tree is pointing to a new branch.
cherry-picking
To choose a subset of changes from a series of changes (typically commits) and record them as a new series of changes on top of a different codebase. In Git, this is performed by thegit cherry-pick command to extract the change introduced by an existing commit on another branch and to record it based on the tip of the current branch as a new commit.
For more information, see git-cherry-pick in the Git documentation.
child team
Within nested teams, the subteam that inherits the parent team's access permissions and @mentions.clean
A working tree is clean if it corresponds to the revision referenced by the current HEAD. Also see "dirty".clone
A clone is a copy of a repository that lives on your computer instead of on a website's server somewhere, or the act of making that copy. When you make a clone, you can edit the files in your preferred editor and use Git to keep track of your changes without having to be online. The repository you cloned is still connected to the remote version so that you can push your local changes to the remote to keep them synced when you're online.clustering
The ability to run GitHub Enterprise services across multiple nodes and load balance requests between them.code frequency graph
A repository graph that shows the content additions and deletions for each week in a repository's history.code of conduct
A document that defines standards for how to engage in a community.code owner
A person who is designated as an owner of a portion of a repository's code. The code owner is automatically requested for review when someone opens a pull request (not in draft mode) that makes changes to code the code owner owns.collaborator
A collaborator is a person with read and write access to a repository who has been invited to contribute by the repository owner.commit
A commit, or "revision", is an individual change to a file (or set of files). When you make a commit to save your work, Git creates a unique ID (a.k.a. the "SHA" or "hash") that allows you to keep record of the specific changes committed along with who made them and when. Commits usually contain a commit message which is a brief description of what changes were made.commit author
The user who makes the commit.Commit graph
A repository graph that shows all the commits made to a repository in the past year.commit ID
Also known as SHA. A 40-character checksum hash that identifies the commit.commit message
Short, descriptive text that accompanies a commit and communicates the change the commit is introducing.compare branch
The branch you use to create a pull request. This branch is compared to the base branch you choose for the pull request, and the changes are identified. When the pull request is merged, the base branch is updated with the changes from the compare branch. Also known as the "head branch" of the pull request.continuous integration
Also known as CI. A process that runs automated builds and tests once a person commits a change to a configured repository on GitHub. CI is a common best practice in software development that helps detect errors.contribution graph
The part of a user's profile that shows their contributions over a period of up to one year, day by day.contribution guidelines
A document explaining how people should contribute to your project.contributions
Specific activities on GitHub that will: - Add a square to a user's contribution graph: "Viewing contributions on your profile" - Add activities to a user's timeline on their profile: "Viewing contributions on your profile"contributor
A contributor is someone who does not have collaborator access to a repository but has contributed to a project and had a pull request they opened merged into the repository.contributors graph
A repository graph that displays the top 100 contributors to a repository.coupon
A GitHub-provided code that users or organizations can use to pay for all or part of their subscription.cron
A time-based job scheduler in Unix-like computer operating systems.cURL
Used in command lines or scripts to transfer data.dashboard
Your personal dashboard is the main hub of your activity on GitHub. From your personal dashboard, you can keep track of issues and pull requests you're following or working on, navigate to your top repositories and team pages, and learn about recent activity in repositories you're watching or participating in. You can also discover new repositories, which are recommended based on users you're following and repositories you have starred. To only view activity for a specific organization, visit your organization's dashboard. For more information, see "About your personal dashboard" or "About your organization dashboard."default branch
The base branch for new pull requests and code commits in a repository. Each repository has at least one branch, which Git creates when you initialize the repository. The first branch is usually calledmain, and is often the default branch.
dependency graph
A repository graph that shows the packages and projects that the repository depends on.dependents graph
A repository graph that shows the packages, projects, and repositories that depend on a public repository.deploy key
A deploy key is an SSH key that is stored on your server and grants access to a single GitHub repository. This key is attached directly to the repository instead of to a personal user account.detached HEAD
Git will warn you if you're working on a detached HEAD, which means that Git is not pointing to a branch and that any commits you make will not appear in commit history. For example, when you check out an arbitrary commit that is not the latest commit of any particular branch, you're working on a "detached HEAD."diagnostics
An overview of a GitHub Enterprise instance's settings and environment.diff
A diff is the difference in changes between two commits, or saved changes. The diff will visually describe what was added or removed from a file since its last commit.directory
A folder containing one or more files or folders. You can create directories to organize the contents of a repository.dirty
A working tree is considered "dirty" if it contains modifications that have not been committed to the current branch.email notifications
Notifications sent to a user's email address.enterprise account
Enterprise accounts allow you to centrally manage policy and billing for multiple organizations. {% data reusables.gated-features.enterprise-accounts %}Explorer
An instance of GraphiQL, which is a "graphical interactive in-browser GraphQL IDE."fast-forward
A fast-forward is a special type of merge where you have a revision and you are "merging" another branch's changes that happen to be a descendant of what you have. In such a case, you do not make a new merge commit but instead just update to this revision. This will happen frequently on a remote-tracking branch of a remote repository.feature branch
A branch used to experiment with a new feature or fix an issue that is not in production. Also called a topic branch.fenced code block
An indented block of code you can create with GitHub Flavored Markdown using triple backticks ``` before and after the code block. See this example.fetch
When you usegit fetch, you're adding changes from the remote repository to your local working branch without committing them.
Unlike git pull, fetching allows you to review changes before committing them to your local branch.
following (users)
To get notifications about another user's contributions and activity.force push
A Git push that overwrites the remote repository with local changes without regard for conflicts.fork
A fork is a personal copy of another user's repository that lives on your account. Forks allow you to freely make changes to a project without affecting the original upstream repository. You can also open a pull request in the upstream repository and keep your fork synced with the latest changes since both repositories are still connected.Free plan
A user account billing plan that is free. Users can collaborate on unlimited public repositories with unlimited collaborators.gist
A gist is a shareable file that you can edit, clone, and fork on GitHub. You can make a gist {% ifversion ghae %}internal{% else %}public{% endif %} or secret, although secret gists will be available to {% ifversion ghae %}any enterprise member{% else %}anyone{% endif %} with the URL.Git
Git is an open source program for tracking changes in text files. It was written by the author of the Linux operating system, and is the core technology that GitHub, the social and user interface, is built on top of.gitfile
A plain.git file, which is always at the root of a working tree and points to the Git directory, which has the entire Git repository and its meta data.
You can view this file for your repository on the command line with git rev-parse --git-dir.
that is the real repository.
GitHub App
GitHub Apps provide a service to an entire organization and use their own identity when performing their function. They can be installed directly on organizations and user accounts and granted access to specific repositories. They come with granular permissions and built-in webhooks.GitHub Flavored Markdown
GitHub-specific Markdown used to format prose and code across GitHub. See GitHub Flavored Markdown Spec or Getting started with writing and formatting on GitHub.GitHub Importer
A tool that quickly imports source code repositories, including commits and revision history, to GitHub for users.GitHub Jobs
A GitHub site where employers can post jobs that GitHub users may be interested in.GitHub Marketplace
A subsite for GitHub users and organizations to purchase and install applications that extend and complement their workflow.GitHub Pages
Also referred to as Pages. A static site hosting service designed to host your personal, organization, or project pages directly from a GitHub repository.GitHub Wiki
A section for hosting wiki style documentation on a GitHub repository.GraphQL
A query language for APIs and a runtime for fulfilling those queries with your existing data.HEAD
A defined commit of a branch, usually the most recent commit at the tip of the branch.head branch
The branch whose changes are combined into the base branch when you merge a pull request. Also known as the "compare branch."Hello, World
A "Hello, World!" program is a computer program that outputs or displays "Hello, World!" to a user. Since this program is usually very simple, it is often used as an example of a programming language's basic syntax and serves as a common first exercise for learning a new programming language.high-availability
A system or component that is continuously operational for a desirably long length of time.hook
During the normal execution of several Git commands, call-outs are made to optional scripts that allow a developer to add functionality or checking. Typically, the hooks allow for a command to be pre-verified and potentially aborted, and allow for a post-notification after the operation is done.hostname
Human-readable nicknames that correspond to the address of a device connected to a network.identicon
An auto-generated image used as a default profile photo when users sign up for GitHub. Users can replace their identicon with their own profile photo.identity provider
Also known as an IdP. A trusted provider that lets you use SAML single sign-on (SSO) to access other websites.instance
An organization's private copy of GitHub contained within a virtual machine that they configure and control.integration
A third-party application that integrates with GitHub. These can be GitHub Apps, OAuth Apps, or webhooks.issue
Issues are suggested improvements, tasks or questions related to the repository. Issues can be created by anyone (for public repositories), and are moderated by repository collaborators. Each issue contains its own discussion thread. You can also categorize an issue with labels and assign it to someone.Jekyll
A static site generator for personal, project, or organization sites.Jekyll Theme Chooser
An automated way to select a visual theme for your Jekyll site without editing or copying CSS files.key fingerprint
A short sequence of bytes used to identify a longer public key.keychain
A password management system in macOS.keyword
A specific word that closes an issue when used within a pull request.label
A tag on an issue or pull request. Repositories come with a handful of default labels, but users can create custom labels.LFS
Git Large File Storage. An open source Git extension for versioning large files.license
A document that you can include with your project to let people know what they can and can't do with your source code.line comment
A comment within a pull request on a specific line of code.line ending
An invisible character or characters that symbolize the end of a line in a text file.Linguist
A library used on GitHub to detect blob languages, ignore binary or vendored files, suppress generated files in diffs, and generate language breakdown graphs.locked personal account
A personal account that cannot be accessed by the user. Accounts are locked when users downgrade their paid account to a free one, or if their paid plan is past due.main
The default development branch. Whenever you create a Git repository, a branch namedmain is created, and becomes the active branch.
In most cases, this contains the local development, though that is purely by convention and is not required.
management console
A section within the GitHub Enterprise interface that contains administrative features.Markdown
Markdown is an incredibly simple semantic file format, not too dissimilar from .doc, .rtf and .txt. Markdown makes it easy for even those without a web-publishing background to write prose (including with links, lists, bullets, etc.) and have it displayed like a website. GitHub supports Markdown and uses a particular form of Markdown called GitHub Flavored Markdown. See GitHub Flavored Markdown Spec or Getting started with writing and formatting on GitHub.markup
A system for annotating and formatting a document.master
The default branch in many Git repositories. By default, when you create a new Git repository on the command line, a branch calledmaster is created.
Many tools now use an alternative name for the default branch.
For example, when you create a new repository on GitHub, the default branch is called main.
members graph
A repository graph that shows all the forks of a repository.mention
A notification sent to a user by prefacing their username with the @ symbol. Users in an organization on GitHub can also be a part of a team that can be mentioned.merge
Merging takes the changes from one branch (in the same repository or from a fork), and applies them into another. This often happens as a "pull request" (which can be thought of as a request to merge), or via the command line. A merge can be done through a pull request via the GitHub.com web interface if there are no conflicting changes, or can always be done via the command line.merge conflict
A difference that occurs between merged branches. Merge conflicts happen when people make different changes to the same line of the same file, or when one person edits a file and another person deletes the same file. The merge conflict must be resolved before you can merge the branches.milestone
A way to track the progress on groups of issues or pull requests in a repository.mirror
A new copy of a repository.nested team
A child team of a parent team. You can have multiple children (or nested) teams.network graph
A repository graph that shows the branch history of the entire repository network, including branches of the root repository and branches of forks that contain commits unique to the network.news feed
An activity view of repositories or people you watch. An organization's News Feed shows activity on repositories owned by the organization.non-fast-forward
When your local copy of a repository is out-of-sync with the upstream repository and you need to fetch the upstream changes before you push your local changes.notification
Updates, delivered by either the web or email depending on your settings, that give you information about the activities you're interested in.OAuth App
A third-party application that uses access tokens rather than passwords to access information for users.OAuth token
The access token used in OAuth Apps to access information for users.open source
Open source software is software that can be freely used, modified, and shared (in both modified and unmodified form) by anyone. Today the concept of "open source" is often extended beyond software, to represent a philosophy of collaboration in which working materials are made available online for anyone to fork, modify, discuss, and contribute to.organization
Organizations are a group of two or more users that typically mirror real-world organizations. They are administered by users and can contain both repositories and teams.organization owner
Users who have full administrative access to the organization they own.origin
The default upstream repository. Most projects have at least one upstream project that they track. By default, origin is used for that purpose.outside collaborator
A user who has been given access to one or more of an organization’s repositories, but has no other access to the organization and is not a member of the organization.owner
Organization members that have complete administrative access to the organization.parent team
Within nested teams, the main team from which child teams inherit access permissions and @mentions.participating notifications
A notification about an update in a conversation in an issue or pull request where your username or team was mentioned or where you have previously replied in a comment.permalink
A permanent static hyperlink to a particular web page.personal account
A GitHub account that belongs to an individual user.pinned repository
A repository that a user has decided to display prominently on their profile.pre-receive hooks
Scripts that run on the GitHub Enterprise server that you can use to implement quality checks.primary email address
The main email address where GitHub sends receipts, credit card or PayPal charges, and other billing-related communication.private contributions
Contributions made to a private (vs. public) repository.private repository
Private repositories are only visible to the repository owner and collaborators that the owner specified.production branch
A branch with final changes that are ready to be used or deployed to an application or site.profile
The page that shows information about a user's activity on GitHub.profile photo
A custom image users upload to GitHub to identify their activity, usually along with their username. This is also referred to as an avatar.project board
Boards within GitHub that are made up of issues, pull requests, and notes that are categorized as cards in columns.protected branch
Protected branches block several features of Git on a branch that a repository administrator chooses to protect. They can't be force pushed, deleted, have changes merged without required checks passing or required reviews approved, or have files uploaded to it from the GitHub web interface. A protected branch is usually the default branch.public contributions
Contributions made to a public (vs. private) repository.public repository
A public repository can be viewed by anyone, including people who aren't GitHub users.pull
Pull refers to when you are fetching in changes and merging them. For instance, if someone has edited the remote file you're both working on, you'll want to pull in those changes to your local copy so that it's up to date. See also fetch.pull access
A synonym for read access.pull request
Pull requests are proposed changes to a repository submitted by a user and accepted or rejected by a repository's collaborators. Like issues, pull requests each have their own discussion forum.pull request review
Comments from collaborators on a pull request that approve the changes or request further changes before the pull request is merged.pulse graph
A repository graph that gives you an overview of a repository's activity.punch graph
A repository graph that shows the frequency of updates to a repository based on the day of week and time of daypush
To push means to send your committed changes to a remote repository on GitHub.com. For instance, if you change something locally, you can push those changes so that others may access them.push a branch
When you successfully push a branch to a remote repository, you update the remote branch with changes from your local branch. When you "push a branch", Git will search for the branch's HEAD ref in the remote repository and verify that it is a direct ancestor to the branch's local HEAD ref. Once verified, Git pulls all objects (reachable from the local HEAD ref and missing from the remote repository) into the remote object database and then updates the remote HEAD ref. If the remote HEAD is not an ancestor to the local HEAD, the push fails.push access
A synonym for write access.read access
A permission level on a repository that allows the user to pull, or read, information from the repository. All public repositories give read access to all GitHub users. A synonym for pull access.README
A text file containing information about the files in a repository that is typically the first file a visitor to your repository will see. A README file, along with a repository license, contribution guidelines, and a code of conduct, helps you share expectations and manage contributions to your project.rebase
To reapply a series of changes from a branch to a different base, and reset the HEAD of that branch to the result.recovery code
A code that helps you regain access to your GitHub account.release
GitHub's way of packaging and providing software to your users.remote
This is the version of a repository or branch that is hosted on a server, most likely GitHub.com. Remote versions can be connected to local clones so that changes can be synced.remote repository
A repository that is used to track the same project but resides somewhere else.remote URL
The place where your code is stored: a repository on GitHub, another user's fork, or even a different server.replica
A GitHub Enterprise instance that provides redundancy for the primary GitHub Enterprise instance.repository
A repository is the most basic element of GitHub. They're easiest to imagine as a project's folder. A repository contains all of the project files (including documentation), and stores each file's revision history. Repositories can have multiple collaborators and can be either public or private.repository cache
A read-only mirror of repositories for your GitHub Enterprise server instance, located near distributed teams and CI clients.repository graph
A visual representation of your repository's data.repository maintainer
Someone who manages a repository. This person may help triage issues and use labels and other features to manage the work of the repository. This person may also be responsible for keeping the README and contributing files updated.required pull request review
Required reviews ensure that pull requests have at least one approved review before collaborators can make changes to a protected branch.required status check
Checks on pull requests that ensure all required CI tests are passing before collaborators can make changes to a protected branch.resolve
The action of fixing up manually what a failed automatic merge left behind.revert
When you revert a pull request on GitHub, a new pull request is automatically opened, which has one commit that reverts the merge commit from the original merged pull request. In Git, you can revert commits withgit revert.
review
Reviews allow others with access to your repository to comment on the changes proposed in pull requests, approve the changes, or request further changes before the pull request is merged.root directory
The first directory in a hierarchy.root filesystem
The base operating system and the GitHub Enterprise application environment.saved reply
A comment you can save and add to your GitHub user account so that you can use it across GitHub in issues and pull requests.scope
Named groups of permissions that an OAuth App can request to access both public and non-public data.seat
A user within a GitHub Enterprise organization. This may be referred to as "seat count."secret team
A team that is only visible to the other people on the team and people with owner permissions.security log
A log that lists the last 50 actions or those performed within the last 90 days.server-to-server request
An API request used by an application that acts as a bot, independently of any particular user. For example, an application that runs on a scheduled basis and closes issues where there has been no activity for a long time. Applications that use this type of authentication don't use a licensed GitHub account so, in an enterprise with a billing plan that allows a certain number of licenses to be used, a server-to-server bot is not consuming one of your GitHub licenses. The token used in a server-to-server request is acquired programmatically, via the GitHub API. See also, "user-to-server request."service hook
Also called "webhook." Webhooks provide a way for notifications to be delivered to an external web server whenever certain actions occur on a repository or organization.single sign-on
Also called SSO. Allows users to sign in to a single location - an identity provider (IdP) - that then gives the user access to other service providers.snapshot
A checkpoint of a virtual machine at a point in time.squash
To combine multiple commits into a single commit. Also a Git command.SSH key
SSH keys are a way to identify yourself to an online server, using an encrypted message. It's as if your computer has its own unique password to another service. {% data variables.product.product_name %} uses SSH keys to securely transfer information to your computer.staging instance
A way to test modifications before they are applied to your actual GitHub Enterprise instance.star
A bookmark or display of appreciation for a repository. Stars are a manual way to rank the popularity of projects.status
A visual representation within a pull request that your commits meet the conditions set for the repository you're contributing to.status checks
Status checks are external processes, such as continuous integration builds, which run for each commit you make in a repository. For more information, see "About status checks."subscription
A user or organization's GitHub plan.team
A group of organization members that reflect your company or group's structure with cascading access permissions and mentions.team maintainer
Organization members that have a subset of permissions available to organization owners to manage teams.Team plan
An organization billing plan that gives you unlimited public and private repositories.timeline
A series of events in a pull request or on a user profile.topic branch
A regular Git branch that is used by a developer to identify a conceptual line of development. Since branches are very easy and inexpensive, it is often desirable to have several small branches that each contain very well defined concepts or small incremental yet related changes. Can also be called a feature branch.topics
A way to explore repositories in a particular subject area, find projects to contribute to, and discover new solutions to a specific problem on GitHub.traffic graph
A repository graph that shows a repository's traffic, including full clones (not fetches), visitors from the past 14 days, referring sites, and popular content.transfer
To transfer a repository means to change the owner of a repository. The new owner will be able to immediately administer the repository's contents, issues, pull requests, releases, and settings.upstream
When talking about a branch or a fork, the primary branch on the original repository is often referred to as the "upstream", since that is the main place that other changes will come in from. The branch/fork you are working on is then called the "downstream". Also called origin.upstream branch
The default branch that is merged into the branch in question (or the branch in question is rebased onto). It is configured viabranch.<name>.remote and branch.<name>.merge.
If the upstream branch of A is origin/B sometimes we say "A is tracking origin/B".
user
Users are people with personal GitHub accounts. Each user has a personal profile, and can own multiple repositories, public or private. They can create or be invited to join organizations or collaborate on another user's repository.user-to-server request
An API request used by an application that performs a task on behalf of a particular user. Where a task is carried out with user-to-server authentication it's shown on GitHub as having been done by a user via an application. For example, you might choose to create an issue from within a third-party application, and the application would do this on your behalf on GitHub. The scope of tasks an application can perform using a user-to-server request is restricted by both the app's and the user's permissions and access. The token used in a user-to-server request is acquired via OAuth. For more information, see "Identifying and authorizing users for GitHub Apps." See also, "server-to-server request."username
A user's handle on GitHub.visible team
A team that can be viewed and @mentioned by every organization member.watch
You can watch a repository or issue to receive notifications when updates are made to an issue or pull request.watching notifications
A notification about activity in a repository a user has subscribed to.web notifications
Notifications displayed in the web interface on GitHub: https://github.com/notificationswebhooks
Webhooks allow you to build or set up GitHub Apps which subscribe to certain events on GitHub.com. Webhooks provide a way for notifications to be delivered to an external web server whenever certain actions occur on a repository or organization. Also called a service hook.write access
A permission level on a repository that allows the user to push, or write, changes to the repository.Git cheatsheet
This Git cheat sheet is a time saver when you forget a command or don't want to use help in the CLI. Learning all available Git commands at once can be a daunting task. You can use "Git Cheat Sheets" for a quick reference to frequently used commands. The "Using Git" cheat sheet is available in several languages. In addition, take a look at our Git and GitHub learning resources page that links to guides, videos and more.Git and GitHub learning resources
There are a lot of helpful Git and GitHub resources on the web. This is a short list of our favorites!Using Git
Familiarize yourself with Git by visiting the official Git project site and reading the ProGit book. You can also review the Git command list.Using GitHub
GitHub Skills offers free interactive courses that are built into GitHub with instant automated feedback and help. Learn to open your first pull request, make your first open source contribution, create a GitHub Pages site, and more. For more information about course offerings, see GitHub Skills. Become better acquainted with GitHub through our getting started articles. See our GitHub flow for a process introduction. Refer to our overview guides to walk through basic concepts. You can connect with developers around the world to ask and answer questions, learn, and interact directly with GitHub staff. To get the conversation started, see "GitHub Community Support."Branches, forks, and pull requests
Learn about Git branching using an interactive tool. Read about forks and pull requests as well as how we use pull requests at GitHub. Access references about using GitHub from the command line.Training
Free courses
GitHub offers a series of interactive, on-demand training courses including Introduction to GitHub; and courses on GitHub specific tools such as GitHub Actions.GitHub's web-based educational programs
GitHub offers live trainings with a hands-on, project-based approach for those who love the command line and those who don't.Training for your company
GitHub offers in-person classes taught by our highly-experienced educators. Contact us to ask your training-related questions.Extras
An interactive online Git course from Pluralsight has seven levels with dozens of exercises in a fun game format. Feel free to adapt our .gitignore templates to meet your needs. Extend your GitHub reach through integrations, or by installing GitHub Desktop and the robust Visual Studio Code text editor. Learn how to launch and grow your open source project with the Open Source Guides.Setting your username in Git
Git uses a username to associate commits with an identity. The Git username is not the same as your GitHub username.About Git usernames
You can change the name that is associated with your Git commits using thegit config command.
The new name you set will be visible in any future commits you push to GitHub from the command line.
If you'd like to keep your real name private, you can use any text as your Git username.
Changing the name associated with your Git commits using git config will only affect future commits and will not change the name used for past commits.
Setting your Git username for every repository on your computer
Open Terminal Terminal Git Bash. Set a Git username:$ git config --global user.name "Mona Lisa"
Confirm that you have set the Git username correctly:
$ git config --global user.name
> Mona Lisa
Setting your Git username for a single repository
Open Terminal Terminal Git Bash. Change the current working directory to the local repository where you want to configure the name that is associated with your Git commits. Set a Git username:$ git config user.name "Mona Lisa"
Confirm that you have set the Git username correctly:
$ git config user.name
> Mona Lisa
Caching your GitHub credentials in Git
If you're cloning GitHub repositories using HTTPS, we recommend you use GitHub CLI or Git Credential Manager (GCM) to remember your credentials. Tip: If you clone GitHub repositories using SSH, then you can authenticate using an SSH key instead of using other credentials. For information about setting up an SSH connection, see "Connecting to GitHub with SSH."GitHub CLI
GitHub CLI will automatically store your Git credentials for you when you chooseHTTPS as your preferred protocol for Git operations and answer "yes" to the prompt asking if you would like to authenticate to Git with your GitHub credentials.
Install GitHub CLI on macOS, Windows, or Linux.
In the command line, enter gh auth login, then follow the prompts.
When prompted for your preferred protocol for Git operations, select HTTPS.
When asked if you would like to authenticate to Git with your GitHub credentials, enter Y.
For more information about authenticating with GitHub CLI, see .
Git Credential Manager
Git Credential Manager (GCM) is another way to store your credentials securely and connect to GitHub over HTTPS. With GCM, you don't have to manually create and store a personal access token, as GCM manages authentication on your behalf, including 2FA (two-factor authentication). Install Git using Homebrew:$ brew install git
Install GCM using Homebrew:
$ brew tap microsoft/git
$ brew install --cask git-credential-manager-core
For MacOS, you don't need to run git config because GCM automatically configures Git for you.
The next time you clone an HTTPS URL that requires authentication, Git will prompt you to log in using a browser window.
You may first be asked to authorize an OAuth app.
If your account or organization requires two-factor auth, you'll also need to complete the 2FA challenge.
Once you've authenticated successfully, your credentials are stored in the macOS keychain and will be used every time you clone an HTTPS URL.
Git will not require you to type your credentials in the command line again unless you change your credentials.
Install Git for Windows, which includes GCM.
For more information, see "Git for Windows releases" from its releases page.
We recommend always installing the latest version.
At a minimum, install version 2.29 or higher, which is the first version offering OAuth support for GitHub.
The next time you clone an HTTPS URL that requires authentication, Git will prompt you to log in using a browser window.
You may first be asked to authorize an OAuth app.
If your account or organization requires two-factor auth, you'll also need to complete the 2FA challenge.
Once you've authenticated successfully, your credentials are stored in the Windows credential manager and will be used every time you clone an HTTPS URL.
Git will not require you to type your credentials in the command line again unless you change your credentials.
Warning: Older versions of Git for Windows came with Git Credential Manager for Windows. This older product is no longer supported and cannot connect to GitHub via OAuth. We recommend you upgrade to the latest version of Git for Windows. Warning: If you cached incorrect or outdated credentials in Credential Manager for Windows, Git will fail to access GitHub. To reset your cached credentials so that Git prompts you to enter your credentials, access the Credential Manager in the Windows Control Panel under User Accounts > Credential Manager. Look for the GitHub entry and delete it. For Linux, install Git and GCM, then configure Git to use GCM. Install Git from your distro's packaging system. Instructions will vary depending on the flavor of Linux you run. Install GCM. See the instructions in the GCM repo, as they'll vary depending on the flavor of Linux you run. Configure Git to use GCM. There are several backing stores that you may choose from, so see the GCM docs to complete your setup. For more information, see "GCM Linux." The next time you clone an HTTPS URL that requires authentication, Git will prompt you to log in using a browser window. You may first be asked to authorize an OAuth app. If your account or organization requires two-factor auth, you'll also need to complete the 2FA challenge. Once you've authenticated successfully, your credentials are stored on your system and will be used every time you clone an HTTPS URL. Git will not require you to type your credentials in the command line again unless you change your credentials. For more options for storing your credentials on Linux, see Credential Storage in Pro Git.
For more information or to report issues with GCM, see the official GCM docs at "Git Credential Manager."
Why is Git always asking for my password?
If Git prompts you for a username and password every time you try to interact with GitHub, you're probably using the HTTPS clone URL for your repository. Using an HTTPS remote URL has some advantages compared with using SSH. It's easier to set up than SSH, and usually works through strict firewalls and proxies. However, it also prompts you to enter your GitHub credentials every time you pull or push a repository. When Git prompts you for your password, enter your personal access token. Alternatively, you can use a credential helper like Git Credential Manager. Password-based authentication for Git has been removed in favor of more secure authentication methods. For more information, see "Creating a personal access token." You can avoid being prompted for your password by configuring Git to cache your credentials for you. Once you've configured credential caching, Git automatically uses your cached personal access token when you pull or push a repository using HTTPS.Updating credentials from the macOS Keychain
You'll need to update your saved credentials in thegit-credential-osxkeychain helper if you change your username, password, or personal access token on GitHub.
Note: Updating credentials from the macOS Keychain only applies to users who manually configured a personal access token using the osxkeychain helper that is built-in to macOS.
We recommend you either configure SSH or upgrade to the Git Credential Manager (GCM) instead.
GCM can manage authentication on your behalf (no more manual personal access tokens) including 2FA (two-factor auth).
When Git prompts you for your password, enter your personal access token.
Alternatively, you can use a credential helper like Git Credential Manager.
Password-based authentication for Git has been removed in favor of more secure authentication methods.
For more information, see "Creating a personal access token."
Updating your credentials via Keychain Access
Click on the Spotlight icon (magnifying glass) on the right side of the menu bar. TypeKeychain Access, then press the Enter key to launch the app.
In Keychain Access, search for github.com.
Find the "Internet password" entry for github.com.
Edit or delete the entry accordingly.
Deleting your credentials via the command line
Through the command line, you can use the credential helper directly to erase the keychain entry.$ git credential-osxkeychain erase
host=github.com
protocol=https
> [Press Return]
If it's successful, nothing will print out.
To test that it works, try and clone a private repository from GitHub.com.
If you are prompted for a password, the keychain entry was deleted.
Git workflows
GitHub flow is a lightweight, branch-based workflow that supports teams and projects that deploy regularly. You can adopt the GitHub flow method to standardize how your team functions and collaborates on GitHub. For more information, see "GitHub flow."About remote repositories
GitHub's collaborative approach to development depends on publishing commits from your local repository to GitHub for other people to view, fetch, and update.About remote repositories
A remote URL is Git's fancy way of saying "the place where your code is stored." That URL could be your repository on GitHub, or another user's fork, or even on a completely different server. You can only push to two types of URL addresses: An HTTPS URL likehttps://github.com/user/repo.git
An SSH URL, like git@github.com:user/repo.git
Git associates a remote URL with a name, and your default remote is usually called origin.
Creating remote repositories
You can use thegit remote add command to match a remote URL with a name.
For example, you'd type the following in the command line:
git remote add origin <REMOTE_URL>
This associates the name origin with the REMOTE_URL.
You can use the command git remote set-url to change a remote's URL.
Choosing a URL for your remote repository
There are several ways to clone repositories available on GitHub.com. When you view a repository while signed in to your account, the URLs you can use to clone the project onto your computer are available below the repository details. For information on setting or changing your remote URL, see "Managing remote repositories."Cloning with HTTPS URLs
Thehttps:// clone URLs are available on all repositories, regardless of visibility.
https:// clone URLs work even if you are behind a firewall or proxy.
When you git clone, git fetch, git pull, or git push to a remote repository using HTTPS URLs on the command line, Git will ask for your GitHub username and password.
When Git prompts you for your password, enter your personal access token.
Alternatively, you can use a credential helper like Git Credential Manager.
Password-based authentication for Git has been removed in favor of more secure authentication methods.
For more information, see "Creating a personal access token."
If you are accessing an organization that uses SAML SSO and you are using a personal access token (classic), you must also authorize your personal access token to access the organization before you authenticate.
For more information, see "About authentication with SAML single sign-on" and "Authorizing a personal access token for use with SAML single sign-on."
Tips:
You can use a credential helper so Git will remember your GitHub credentials every time it talks to GitHub.
For more information, see "Caching your GitHub credentials in Git."
To clone a repository without authenticating to GitHub on the command line, you can use GitHub Desktop to clone instead.
For more information, see "Cloning a repository from GitHub to GitHub Desktop."
If you'd rather use SSH but cannot connect over port 22, you might be able to use SSH over the HTTPS port.
For more information, see "Using SSH over the HTTPS port."
Cloning with SSH URLs
SSH URLs provide access to a Git repository via SSH, a secure protocol. To use these URLs, you must generate an SSH keypair on your computer and add the public key to your account on GitHub.com. For more information, see "Connecting to GitHub with SSH." When yougit clone, git fetch, git pull, or git push to a remote repository using SSH URLs, you'll be prompted for a password and must provide your SSH key passphrase.
For more information, see "Working with SSH key passphrases."
If you are accessing an organization that uses SAML single sign-on (SSO), you must authorize your SSH key to access the organization before you authenticate.
For more information, see "About authentication with SAML single sign-on" and "Authorizing an SSH key for use with SAML single sign-on" in the GitHub Enterprise Cloud documentation.
Tip: You can use an SSH URL to clone a repository to your computer, or as a secure way of deploying your code to production servers.
You can also use SSH agent forwarding with your deploy script to avoid managing keys on the server.
For more information, see "Using SSH agent forwarding."
Cloning with GitHub CLI
You can also install GitHub CLI to use GitHub workflows in your terminal. For more information, see "About GitHub CLI."Cloning with Subversion
Note: Subversion support will be removed from GitHub on January 8, 2024. A future release of GitHub Enterprise Server after January 8, 2024 will also remove Subversion support. To read more about this, see the GitHub blog. You can also use a Subversion client to access any repository on GitHub. Subversion offers a different feature set than Git. For more information, see "What are the differences between Subversion and Git?" You can also access repositories on GitHub from Subversion clients. For more information, see "Support for Subversion clients."Managing remote repositories
Learn to work with your local repositories on your computer and remote repositories hosted on GitHub.Adding a remote repository
To add a new remote, use thegit remote add command on the terminal, in the directory your repository is stored at.
The git remote add command takes two arguments:
A remote name, for example, origin
A remote URL, for example, https://github.com/user/repo.git
For example:
$ git remote add origin https://github.com/USER/REPO.git
# Set a new remote
$ git remote -v
# Verify new remote
> origin https://github.com/USER/REPO.git (fetch)
> origin https://github.com/USER/REPO.git (push)
For more information on which URL to use, see "About remote repositories."
Troubleshooting: Remote origin already exists
This error means you've tried to add a remote with a name that already exists in your local repository.$ git remote add origin https://github.com/octocat/Spoon-Knife.git
> fatal: remote origin already exists.
To fix this, you can:
Use a different name for the new remote.
Rename the existing remote repository before you add the new remote.
For more information, see "Renaming a remote repository" below.
Delete the existing remote repository before you add the new remote.
For more information, see "Removing a remote repository" below.
Changing a remote repository's URL
Thegit remote set-url command changes an existing remote repository URL.
Tip: For information on the difference between HTTPS and SSH URLs, see "About remote repositories."
The git remote set-url command takes two arguments:
An existing remote name.
For example, origin or upstream are two common choices.
A new URL for the remote.
For example:
If you're updating to use HTTPS, your URL might look like:
https://github.com/USERNAME/REPOSITORY.git
If you're updating to use SSH, your URL might look like:
git@github.com:USERNAME/REPOSITORY.git
Switching remote URLs from SSH to HTTPS
Open Terminal Terminal Git Bash. Change the current working directory to your local project. List your existing remotes in order to get the name of the remote you want to change.$ git remote -v
> origin git@github.com:USERNAME/REPOSITORY.git (fetch)
> origin git@github.com:USERNAME/REPOSITORY.git (push)
Change your remote's URL from SSH to HTTPS with the git remote set-url command.
$ git remote set-url origin https://github.com/USERNAME/REPOSITORY.git
Verify that the remote URL has changed.
$ git remote -v
# Verify new remote URL
> origin https://github.com/USERNAME/REPOSITORY.git (fetch)
> origin https://github.com/USERNAME/REPOSITORY.git (push)
The next time you git fetch, git pull, or git push to the remote repository, you'll be asked for your GitHub username and password.
When Git prompts you for your password, enter your personal access token.
Alternatively, you can use a credential helper like Git Credential Manager.
Password-based authentication for Git has been removed in favor of more secure authentication methods.
For more information, see "Creating a personal access token."
You can use a credential helper so Git will remember your GitHub username and personal access token every time it talks to GitHub.
Switching remote URLs from HTTPS to SSH
Open Terminal Terminal Git Bash. Change the current working directory to your local project. List your existing remotes in order to get the name of the remote you want to change.$ git remote -v
> origin https://github.com/USERNAME/REPOSITORY.git (fetch)
> origin https://github.com/USERNAME/REPOSITORY.git (push)
Change your remote's URL from HTTPS to SSH with the git remote set-url command.
$ git remote set-url origin git@github.com:USERNAME/REPOSITORY.git
Verify that the remote URL has changed.
$ git remote -v
# Verify new remote URL
> origin git@github.com: USERNAME/REPOSITORY.git (fetch)
> origin git@github.com: USERNAME/REPOSITORY.git (push)
Troubleshooting: No such remote '[name]'
This error means that the remote you tried to change doesn't exist:$ git remote set-url sofake https://github.com/octocat/Spoon-Knife
> fatal: No such remote 'sofake'
Check that you've correctly typed the remote name.
Renaming a remote repository
Use thegit remote rename command to rename an existing remote.
The git remote rename command takes two arguments:
An existing remote name, for example, origin
A new name for the remote, for example, destination
Example of renaming a remote repository
These examples assume you're cloning using HTTPS, which is recommended.$ git remote -v
# View existing remotes
> origin https://github.com/OWNER/REPOSITORY.git (fetch)
> origin https://github.com/OWNER/REPOSITORY.git (push)
$ git remote rename origin destination
# Change remote name from 'origin' to 'destination'
$ git remote -v
# Verify remote's new name
> destination https://github.com/OWNER/REPOSITORY.git (fetch)
> destination https://github.com/OWNER/REPOSITORY.git (push)
Troubleshooting: Could not rename config section 'remote.[old name]' to 'remote.[new name]'
This error means that the old remote name you typed doesn't exist. You can check which remotes currently exist with thegit remote -v command:
$ git remote -v
# View existing remotes
> origin https://github.com/OWNER/REPOSITORY.git (fetch)
> origin https://github.com/OWNER/REPOSITORY.git (push)
Troubleshooting: Remote [new name] already exists
This error means that the remote name you want to use already exists. To solve this, either use a different remote name, or rename the original remote.Removing a remote repository
Use thegit remote rm command to remove a remote URL from your repository.
The git remote rm command takes one argument:
A remote name, for example, destination
Removing the remote URL from your repository only unlinks the local and remote repositories.
It does not delete the remote repository.
Example of removing a remote repository
These examples assume you're cloning using HTTPS, which is recommended.$ git remote -v
# View current remotes
> origin https://github.com/OWNER/REPOSITORY.git (fetch)
> origin https://github.com/OWNER/REPOSITORY.git (push)
> destination https://github.com/FORKER/REPOSITORY.git (fetch)
> destination https://github.com/FORKER/REPOSITORY.git (push)
$ git remote rm destination
# Remove remote
$ git remote -v
# Verify it's gone
> origin https://github.com/OWNER/REPOSITORY.git (fetch)
> origin https://github.com/OWNER/REPOSITORY.git (push)
Note: git remote rm does not delete the remote repository from the server.
It simply
removes the remote and its references from your local repository.
Troubleshooting: Could not remove config section 'remote.[name]'
This error means that the remote you tried to delete doesn't exist:$ git remote rm sofake
> error: Could not remove config section 'remote.sofake'
Check that you've correctly typed the remote name.
Associating text editors with Git
Use a text editor to open and edit your files with Git.Using Visual Studio Code as your editor
Install Visual Studio Code (VS Code). For more information, see "Setting up VS Code" in the VS Code documentation. Open Terminal Terminal Git Bash. Type this command:$ git config --global core.editor "code --wait"
Install Visual Studio Code (VS Code).
For more information, see "Setting up VS Code" in the VS Code documentation.
Open Terminal Terminal Git Bash.
Type this command:
$ git config --global core.editor "code --wait"
Install Visual Studio Code (VS Code).
For more information, see "Setting up VS Code" in the VS Code documentation.
Open Terminal Terminal Git Bash.
Type this command:
$ git config --global core.editor "code --wait"
Using Sublime Text as your editor
Install Sublime Text. For more information, see "Installation" in the Sublime Text documentation. Open Terminal Terminal Git Bash. Type this command:$ git config --global core.editor "subl -n -w"
Install Sublime Text.
For more information, see "Installation" in the Sublime Text documentation.
Open Terminal Terminal Git Bash.
Type this command:
$ git config --global core.editor "'C:/Program Files (x86)/sublime text 3/subl.exe' -w"
Install Sublime Text.
For more information, see "Installation" in the Sublime Text documentation.
Open Terminal Terminal Git Bash.
Type this command:
$ git config --global core.editor "subl -n -w"
Using TextMate as your editor
Install TextMate. Install TextMate'smate shell utility.
For more information, see "" in the TextMate documentation.
Open Terminal Terminal Git Bash.
Type this command:
$ git config --global core.editor "mate -w"
Using Notepad++ as your editor
Install Notepad++ from https://notepad-plus-plus.org/. For more information, see "Getting started" in the Notepad++ documentation. Open Terminal Terminal Git Bash. Type this command:$ git config --global core.editor "'C:/Program Files (x86)/Notepad++/notepad++.exe' -multiInst -notabbar -nosession -noPlugin"
Configuring Git to handle line endings
To avoid problems in your diffs, you can configure Git to properly handle line endings.About line endings
Every time you press return on your keyboard you insert an invisible character called a line ending. Different operating systems handle line endings differently. When you're collaborating on projects with Git and GitHub, Git might produce unexpected results if, for example, you're working on a Windows machine, and your collaborator has made a change in macOS. You can configure Git to handle line endings automatically so you can collaborate effectively with people who use different operating systems.Global settings for line endings
Thegit config core.autocrlf command is used to change how Git handles line endings.
It takes a single argument.
On macOS, you simply pass input to the configuration.
For example:
$ git config --global core.autocrlf input
# Configure Git to ensure line endings in files you checkout are correct for macOS
On Windows, you simply pass true to the configuration.
For example:
$ git config --global core.autocrlf true
# Configure Git to ensure line endings in files you checkout are correct for Windows.
# For compatibility, line endings are converted to Unix style when you commit files.
On Linux, you simply pass input to the configuration.
For example:
$ git config --global core.autocrlf input
# Configure Git to ensure line endings in files you checkout are correct for Linux
Per-repository settings
Optionally, you can configure a .gitattributes file to manage how Git reads line endings in a specific repository. When you commit this file to a repository, it overrides thecore.autocrlf setting for all repository contributors.
This ensures consistent behavior for all users, regardless of their Git settings and environment.
The .gitattributes file must be created in the root of the repository and committed like any other file.
A .gitattributes file looks like a table with two columns:
On the left is the file name for Git to match.
On the right is the line ending configuration that Git should use for those files.
Example
Here's an example .gitattributes file. You can use it as a template for your repositories:# Set the default behavior, in case people don't have core.autocrlf set.
* text=auto
# Explicitly declare text files you want to always be normalized and converted
# to native line endings on checkout.
*.c text
*.h text
# Declare files that will always have CRLF line endings on checkout.
*.sln text eol=crlf
# Denote all files that are truly binary and should not be modified.
*.png binary
*.jpg binary
You'll notice that files are matched—*.c, *.sln, *.png—, separated by a space, then given a setting—text, text eol=crlf, binary.
We'll go over some possible settings below.
text=auto Git will handle the files in whatever way it thinks is best.
This is a good default option.
text eol=crlf Git will always convert line endings to CRLF on checkout.
You should use this for files that must keep CRLF endings, even on OSX or Linux.
text eol=lf Git will always convert line endings to LF on checkout.
You should use this for files that must keep LF endings, even on Windows.
binary Git will understand that the files specified are not text, and it should not try to change them.
The binary setting is also an alias for -text -diff.
Refreshing a repository after changing line endings
When you set thecore.autocrlf option or commit a .gitattributes file, you may find that Git reports changes to files that you have not modified.
Git has changed line endings to match your new configuration.
To ensure that all the line endings in your repository match your new configuration, backup your files with Git, delete all files in your repository (except the .git directory), then restore the files all at once.
Save your current files in Git, so that none of your work is lost.
$ git add .
-u
$ git commit -m "Saving files before refreshing line endings"
Add all your changed files back and normalize the line endings.
$ git add --renormalize .
Show the rewritten, normalized files.
$ git status
Commit the changes to your repository.
$ git commit -m "Normalize all the line endings"
Ignoring files
You can configure Git to ignore files you don't want to check in to GitHub.Configuring ignored files for a single repository
You can create a .gitignore file in your repository's root directory to tell Git which files and directories to ignore when you make a commit. To share the ignore rules with other users who clone the repository, commit the .gitignore file in to your repository. GitHub maintains an official list of recommended .gitignore files for many popular operating systems, environments, and languages in thegithub/gitignore public repository.
You can also use gitignore.io to create a .gitignore file for your operating system, programming language, or IDE.
For more information, see "github/gitignore" and the "gitignore.io" site.
Open Terminal Terminal Git Bash.
Navigate to the location of your Git repository.
Create a .gitignore file for your repository.
$ touch .gitignore
If the command succeeds, there will be no output.
For an example .gitignore file, see "Some common .gitignore configurations" in the Octocat repository.
If you want to ignore a file that is already checked in, you must untrack the file before you add a rule to ignore it.
From your terminal, untrack the file.
$ git rm --cached FILENAME
Configuring ignored files for all repositories on your computer
You can also create a global .gitignore file to define a list of rules for ignoring files in every Git repository on your computer. For example, you might create the file at ~/.gitignore_global and add some rules to it. Open Terminal Terminal Git Bash. Configure Git to use the exclude file ~/.gitignore_global for all Git repositories.$ git config --global core.excludesfile ~/.gitignore_global